Materials:
Brown cardstock
White cardstock
A small scrap of decorative paper for the inside of the doors
Embellishments
Ribbon
1. Start by making the base of the house. To do this cut a piece of cardstock 3 1/2 x 5 3/4".
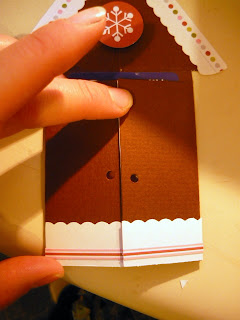
2. Score a line along each side at 1 1/2 inches to form the doors.
3. Fold in doors and crease.
4. Cut a piece off the top of each door, about a 1/4 inch down from the top and all the way to the fold (see image)
5. Now make the roof. I am sure there is some mathematical equation for this; if so, I long forgot it. This is the method I came up with. Start with a piece of paper 3 3/4 x 4".
6. Fold in half with 3 3/4 being the height of the paper.
7. Draw a notch in towards the fold about 5/8 inch long and about a 1/4 inch deep (see image)
8. Cut out the notch.
9. Now place a ruler from the corner to the center fold. Cut with an Exacto knife or draw a line and cut with scissors.
It will look like this after the cut.
10. Now open the roof piece and glue to the back side of the house base. It will look like this:
11. All that is left is to decorate. To make the snow I cut strips of white paper with some decorative scissors that have a scalloped edge.
I added a strip of polka dot paper to each side. The remaining decorations are all up to you. I added a piece of decorative paper to the inside of each door. I put a strip of snow on the outside of the doors as well. You could add buttons or brads. The sky is the limit really. There is no wrong way to decorate a gingerbread house.
12. Now to make the gift card pocket. I cut a piece of paper that was 2 3/4 x 3 1/4". I wanted a circle notch cut from the top so I traced a spool of thread as my pattern for that.
Looks like this when cut.
13. I decided to sew my gift card pocket in place. It could be attached with brads or eyelets. I wouldn't recommend glue or tape as it would be hard to get the gift card in and out. If you decide to sew then what I always do once I have completed my sewing is thread the top strings through a needle and then through the card to the back side. I tie them in a knot and then cut. Don't attempt to backstitch on paper. That doesn't work so well.
14. Lastly punch two holes (one on each side) in the doors. Tie a ribbon through both and into a bow and you are done.
How sweet!!!
The inside.
Happy card making and gift giving.


Gahhhh adorable! And this doesn't look like a difficult project - what a great way to give gift cards! I'm always looking for ways to spice them up, so I'll have to try this out sometime. Thanks =)
ReplyDeleteGingerbread Gift Card Holder is looking so beautiful you have done such a creative work...
ReplyDeleteGift Card Printing
Plastic Card
Nice post with great tutorial. I really appreciate your work of making this. I will like to make Plastic Card Holders. Thanks for sharing.
ReplyDelete