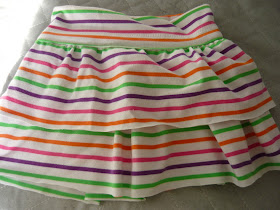
The original tutorial for this skirt comes from Make it and Love it. This is my version of her idea. Mine has an extra ruffly layer and I changed how I assembled my pieces.
1. Buy a t-shirt (size XL works great).2. Cut one strip from the bottom about 6" wide. This is going to form the waist band. It is a yoga style waist band and folds in half so that is why it is 6" wide. I use this piece as the waist band because I like the finished edge on it. And because I am doing two layers on the skirt it looks better to have two layers without a finished bottom rather than one finished and one unfinished.
3. Lay out this strip and cut to your desired length. This would be equal to the width of the girl you are making this for. It is stretchy (though not all t-shirts are created equal so be aware), so you will want it slightly smaller than the waist of a pair of pants of whomever you are making this for. Most of the t-shirts I have used are very stretchy and the waists have always been a bit on the big side so measure and then go a bit smaller is my suggestion.
4. Next cut your remaining strips of fabric to make the skirt. These can be what ever length you want. A longer one for the under layer and a shorter one for the top ruffle.
On this t-shirt by the time I cut the waist band and the first skirt layer I didn't have enough room on the t-shirt to cut another strip using the t-shirts side seams as my side seams. This is not a problem though.
I just cut two strips from the middle part of the shirt...
And I sewed the sides together using my serger.
Here is a handy hint to save thread while serging: instead of sewing off the edge and then cutting your thread, just bring up the other edge that you have to sew and continue sewing. It will save you a little thread everytime.
Okay so now I have a second skirt piece.
5. Sew the waist band piece right sides together as well.
6. Next you are going to sew a basting stitch around the top edge of each of the skirt pieces.
7. Pull your threads to gather the skirt tops.
(this is my top layer)8. Pin both layers together. Here is another handy tint: If you use a shirt that is long enough for you to cut your waist band and both skirt layers so that they are all the same size, then you can put both skirt layers together first and sew them together. Then sew your row of basting stitches and pull to gather the skirt pieces.
9. Next (this is important so watch closely) pin the waist band piece with the right side facing out and the wrong side facing the skirt. The finished edge should be at the bottom and the cut edge is the one you are going to sew to the skirt pieces. Adjust your skirt so that it is the same width as the waist band piece.
10. Sew these together. I am not going to lie: this is easiest with a serger, but if your machine has a stretch stitch you will want to use that (if using a regular sewing machine) otherwise your stitches will break as you try and get this on and off a wiggly body.
11. Pull the waist band up (it should have the wrong side out now)...
and fold it over. Pin in down where you will want it to stay.
12. One more handy hint: use clear thread. It is fantastic. You use whatever color as your bobbin thread and then clear thread as your top thread (it can't be seen, you don't have to change it for every new thing you are sewing and it works slick for basting stitches and gathers).
My bobbin thread is white.
13. Now stitch around the bottom of the waist band. I decided I liked this sewn down because it was always curling up and unfolding. This will prevent that. Use a stretch stitch when doing this part don't forget.
And there you have it. A perfectly springy, soft, stretchy fun skirt.


Adorable. I am always looking for fun ways to refashion. What size would you say the one you made turned out? Thanks for sharing this tutorial, it's perfect!
ReplyDeleteThe one I made was for Small Fry and she wears a size 3. Even then it is a bit loose.
ReplyDeleteCute skirt! I bet it is super comfty!!!
ReplyDeleteI love your skirts! They are so cute! I really need to get moving and make some for my little girls! I have a 5 year old and a 9 year old, I'm not sure how big I would need to make them.
ReplyDelete