Showing posts with label canning. Show all posts

Dec 2, 2010

I can because I can

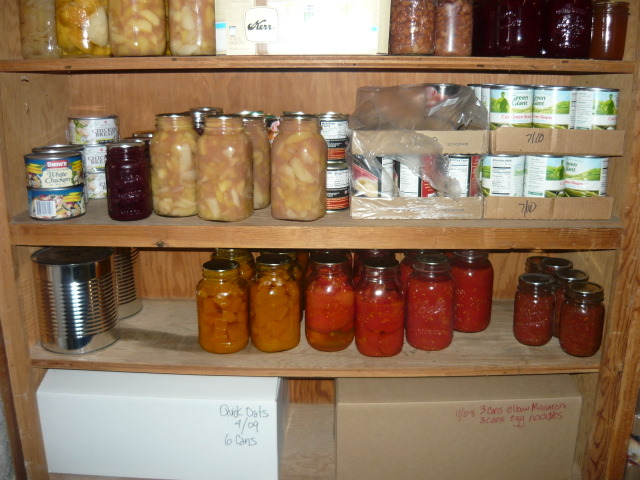
 I think  I am officially done canning for the year.  I have filled all of my quart jars with tomatoes, pears, peaches, pickles, pumpkin and pie filling.  I have done corn, pizza sauce, apple sauce, enchilada sauce, pinto beans, raspberry jam, and salsa.  I have never canned this much in my life and I think I have done my food storage duty for the year. 
 I just love seeing all those bottles lined up. 

 Time to rest up and recoup for a whole new canning season next summer.  Thank heavens I can't grow a garden year round-this canning business is a ton of work. 
Pin It!
Print Friendly and PDF

Nov 26, 2010

Canned Pumpkin

Before you toss your pumpkins from the fall have you ever tried canning them?  This was something new I tried this fall and it is FABULOUS!!! We got a bunch of free pumpkins from out local pumpkin patch and normally I cook them and then freeze the pumpkin but this year I thought I would try canning it.  You have to peel and seed the pumpkin.  I cut mine in half and then scooped out the seeds.  Then cut it into sections.  I peeled each section with a knife (this is a bit tough but you get the hang of it).  Then cut it into pieces.  Put all the pieces in a large pot, cover with water and boil for 2 minutes.  Then you put it in jars, cover with boiling water and process in a pressure canner (the only downfall is you have to can it for 90 minutes).  Comes out soft and ready to use in pies, breads, cookies, cakes.  Just like the stuff you get from the store.  It is recommended that you use stringless pumpkins (like sugar pumpkins).  Sugar pumpkins are the only stringless one I know of, plus Martha Stewart says they are the best for making pies so why would we ever want to use anything else?  Now I have all kinds of canned pumpkin at my finger tips and I didn't have to just toss out my fall decorations.  It's a good thing-as Martha would say.
Pin It!
Print Friendly and PDF

Oct 14, 2010

Things you probably already know

Just wanted to share a few things (random and in no particular order) that I have discovered and love-which you all probably already know about. But in case I am not the last person on earth to have found them or tried them I will share them in hopes to make other lives a little better (and in some cases yummier).
#1. Executive Homemaker. Have you checked out this blog? I hadn't until I was searching the Internet for some printable cupcake toppers and was lead to it. Fabulous stuff to make a mom and wife's and ladies life a whole lot cuter, funner, easier and more organized. And the best part is you can sign up to have stuff sent to your e-mail. So every couple of days you get a cute free printable sent to your inbox (and it sure beats junk mail). Really cute stuff. Go here to check it out.
#2 The best and quickest way to make doughnuts. Oh my goodness all these years people I have been wasting my time I tell you, making cake doughnuts from scratch (not like I have done it a ton but enough to have considered it a waste of my time) after finding out that you can use those package refrigerator biscuits instead. Now under normal circumstances I think they are terrible as an actual biscuit but deep fry those suckers and cover them in a glaze and they are heavenly. I even used the cheapo Western Family kind and they were divine. I wanted mini doughnuts so I broke each biscuit in half, then rolled the half in a ball, flattened it with my hand, and poked a hole in the middle. Deep fry in a bit of oil. They were the perfect size. I made a simple glaze of powdered sugar, milk and vanilla for half of them and dipped the other half in sugar. WOW-seriously could have eaten the whole plate myself. I am not promoting these as a health food by any means. Those biscuits are loaded with who knows what but if you want to make some good doughnuts quick and cheap-this is the way to go.
#3 Easy applesauce-courtesy of Martha Stewart. I found this recipe in a Martha Stewart Baby Magazine (remember when they had those and the Kids editions too-oh such great magazines that you can no longer get). She was showing how to make applesauce as a baby food. I thought, "why not do the same thing on a larger scale to use for canning?" So here is what you do. Sorry because there are no measurements really.
First start by washing, coring and cutting up your apples into about 1 inch pieces. You don't need to peel them. I REPEAT-DO NOT PEEL. (I would say I use about 25 medium size apples per sauce pan full but I just cut until my pot is full). Put those into a large pot and add water-enough to steam them (I do about a cup and half-maybe two cups-not too little not too much). Put a lid on your pot and steam over medium heat until the apples are soft. They will look like this-only this is taken after I have removed about half of my apples.
Put your apples into a blender with part of the water. You will want to have at least 1/3 of your blender filled with water otherwise your applesauce will be too thick. Blend. You may need to add more water if it is too thick. You can have thicker or thinner applesauce too depending on what your preference is. Better to start with less and have to add more.
Then press through a strainer. If you have one a little larger and in better shape than mine you would be in business but even this small one does the trick. I pour in part of the applesauce and press it around with a rubber scraper. The applesauce will go through and the skins will...
stay on top like this and you can scoop them out and throw them away. You may get the odd skin in your sauce but you will end up with a very smooth and creamy applesauce.
Like this. You could do this on a large scale to can or on a small scale to eat fresh for your family or as baby food. Easy and delicious.
#4 Crock pot Chile Verde. I am posting this on for my friend Tali because I was talking to her on the phone while preparing this and she said it sounded fantastic and oh it was delicious. Whenever I have my choice of restaurant it is Mexican and one of my favorites is Chile Verde. Well here is a super easy crock pot version I just discovered.
You will need:
1-2 pounds boneless pork chops
1/2 cup baby carrots cut up (or you could have more or omit this entirely)
1 jar Salsa Verde
Put the pork chops in your crock pot. Add the carrots and cover with the jar of salsa verde. Cook on low for 8 hours of high for 4 (though my crock pot never takes that long). You can serve the pork chops whole or do what we did and shred them and then serve them on tortillas with beans and all the trimmings. So easy and so tasty. But you probably already knew all of this.
Pin It!
Print Friendly and PDF

Aug 22, 2010

Confessions of an amateur canner part 2

Last year I blogged about my first experience canning peaches-the stress, the phone calls home to my mother, the unkind feelings I had towards my husband while he was off hunting leaving me with a baby and a sink full of peaches to try and bottle. Well this year has brought a new set of firsts-my first experience with a pressure canner. Let me just say that I have wanted a pressure canner for a while, and I grew up around one but I have been scared to death of it since I got it last Christmas and haven't dared to even try it. But beans were my motivation (my little girls love beans). I have a ton of dry pinto beans that I need to do something with. I have posted before my lack of success with cooking them into anything more than a crunchy bean mess so when my friend and a neighbor told me it was super easy to can dry beans with a pressure canner I knew I had to conquer my fears.
So first you have to soak your beans overnight. My instructions told me about 3 pounds of dry beans. My beans are in a large bucket and I had no way of knowing how much 3 pounds was (hence the need for a kitchen scale for Christmas hint hint) so I just put a bunch in a pot and covered them with water. Well I think I overestimated. They just kept growing and growing and soon filled a second pot and soon filled a large metal bowl as well. Oops. Next you have to rinse your beans and cover them with fresh water and bring them to a boil and boil for 30 minutes. If you have ever boiled dry beans you may know that they make this lovely foam stuff-that tends to boil over when your pot is as full as mine was which by the way when burned onto your burner smells just like cigarette smoke. After your 30 minutes is up you put a 1/2 tsp of salt into pint jars (1 tsp of salt if you are using quarts) fill jars with beans and cooking liquid, adjust lids and process in pressure canner for 75 minutes for pints, 90 minutes for quarts at 10 lbs pressure for my altitude (you would want to check and see what pressure you would use where you live). So I got my first batch in my canner and put the canner lid on and turned up my heat and read and reread my instruction manual 4 times. I was to let the canner vent steam for 10 minutes. I watch vigilantly for the steam, set the timer and keep a very close eye to make sure the steam is "steady" as my manual tells me. Then I am supposed to place my pressure gauge on top, increase my heat and wait for the gauge to "start a gentle rocking motion". This probably makes total sense to the people who wrote the manual to go with the pressure canner but to a first timer like myself I had no idea what I was looking for, how long it would take to get there or what to expect my canner to do along the way. As the pressure was building I swear that silver pot looked like it was going to take off and shoot around the room out of control at any minute. It was spitting water, steaming, sounding like it was ready to blast off. I finally had to call my mom to get some reassurance. She wasn't able to help me know if it was in fact ready to explode or totally normal over the phone but it did take my mind off it long enough for me to stop watching my "pot boil" and when I turned around to look again sure enough the pressure gauge was rocking gently, the canner did not shoot off into the backyard nor outer space and after 75 minutes and the proper cool down time I was left with these beauties:
Well this is after 2 canner loads, with a third one taking it's turn in the silver rocket (my new affectionate name for my pressure canner) as I took the picture. Turns out it really is pretty easy-once you understand the tricks of the trade.
Pin It!
Print Friendly and PDF

Sep 5, 2009

A day in the life of an amateur canner

Canning; my mom did it, her mother did it and on back through the generations. So it is only natural that I too would have the instinct to want to put up food in glass jars for future eating and the satisfaction that I too am preserving this seasons harvest for later enjoyment. Or something like that.
To me canning is the ultimate test in multi-tasking. Having jars hot, lids hot, syrup hot, canner hot, fruit ready all at the same time in limited space with no help, one can only feel like a truly successful (or completely insane woman) at the end of a canning day.
Last year marked my first attempt at canning and I must admit day one ended in tears and plenty of ill feelings towards my husband who spent the day hunting leaving me home with 2 boxes of peaches an a 5 month old baby. But I persevered and survived and came back stronger this year to give it another go.
So for all those who are contemplating canning or are beginner canners, or for those who are more seasoned perhaps you might recall days gone by that were similar to this experience.

Canning Peaches
The process actually begins the night before in Wal-Mart on a trip out of town for a baseball game with a screaming 16 month old because it is nearing 10PM and she has had only a 45 minute nap for the whole day. We are looking for the canning supplies. Why must every stinking Wal-Mart put things in a different place? Could not for the life of me find the canning supplies nor by that time did I care anymore anyway. Add in a cashier who looked at my crying child and said, "she seems to be having a rough time" and then proceeds to scan our items at a snails pace adding in unnecessary chit chat along the way. "Thank you Wal-Mart cashier for helping the situation." I digress.
The day of canning begins with a scan of the box of peaches acquired 2 days before. "Great, part of the peaches are spoiling." What to do? Are they usable? Who to call for answers? Who else but my mother; the canning expert in my eyes. (Side note, I learned after my first canning experience why my mom always canned through the night while there were no interruptions, the house was cooler and all children were asleep and there was no one to see the tears should they happen to flow). My mom tells me what to do about the spoiled peaches.
Then it begins:
-small fry down for a nap
-kick into warp speed
-water onto boil to blanch peaches
-jars washed in hot water and put in a sink of hot water
-blanch peaches
-peel peaches while canner goes on to begin to heat
-why are some of the peaches peeling easier than others? And why is it that a peach can be so ripe on the top it is spoiling and not ripe enough to peel off the skin on the bottom. Ughhh
-make the simple syrup
-back to the peaches, start slicing peaches.
-more slicing
-still more slicing (great what looked like only enough for one canner load now looks like it might make 2) Wasn't planning on that. Should be grateful right?
-find the lids, get them in some hot water
-Great not enough simple syrup. Add more water and sugar and boil some more.
-Start filling jars
-Add the syrup, put on the lids screw on the rings and repeat and repeat and repeat.
-Great I forgot to remove the air bubbles before putting on the lids. Now what?
-Call to the expert mother once again. Phone is busy. I will try again in a minute.
-Fill remaining jars and remove the air bubbles this time. Now what about all these left over peach slices. How long will they last? What to do with them until it is time to can again. I'll ask my mom. Call home again. Still busy. How can it be busy?
-Fill the canner with peaches (totally forgot I was going to ask about the air bubbles). Wait for water to come to a boil again. Begin to clean up. Call home again. Still busy. Doesn't she know I am canning here, how can the phone be busy for this long. She needs call waiting for sure.
-Can't waste any down time. Check my crock of pickles and remove the scum (yes it is okay that there was scum). Clean my crock of pickles and the plates. Run outside to start removing the handles from the dresser that I need to prime and paint for small fry's new room. Come back in, try calling home again. Still busy. Fine I will have to figure this out on my own. I leave the extra peaches and decide to start a second canner load when the first is done.
-The time passes and the allotted time is up. Jars come out.
-Bing Small fry cries and needs to get up.
-Ding round two begins this time only with small fry under my feet as well as the cooling racks, a pizza pan, jar lids, a spoon, sippy cup, toaster oven rack (the girl really likes racks), bread pans now are on the floor too. I keep her happy by offering small bites of apple in between filling jars and putting on lids. This time at least I don't have to slice all those peaches. I get 4 more jars in the canner and it is now time to make lunch. Sigh a big sigh and move on to the next task and mess. Always seems like there is a mess. And a sink of dishes. All part of the fun.
And why you ask would one put herself through all of this? For this:
7 beautiful jars of peaches. That is right I said 7. Well plus the 4 that are still in the canner as I type cooling down slightly so I can take them out. All of that work for 11 jars. If you are my mom that is only a small fraction of what is to come throughout the night.
Are we all nuts? Probably. Nuts, brave and strong and driven by some inner desire to see shelves full of shiney jars. I'm hooked now. It will take a long time before I can do it like my mom but it appears there is no turning back.
Pin It!
Print Friendly and PDF
Related Posts Plugin for WordPress, Blogger...