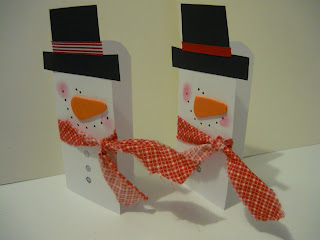
 You will start with a piece of white cardstock (regular size 8.5x11). Fold both sides in to the middle (I call it hamburger style meaning the short sides)
 Should look like this (in case you are still confused about which way, the height of this is 8.5".
 Now cut down the center in between the two flaps so that you end up with 2 long, skinny cards like this.
 To make the top of the snowman, round the corners of the top of the card. Mine was 5.5" tall. I free handed my curved corners. They are going to be hidden under his hat so it doesn't have to be perfect. Then cut through both layers of the card on this line.
 Next make his hat. Again I free handed a black hat. I like things to be sort of rustic looking so I didn't worry about perfect dimensions. My philosophy on making really cute crafts is: don't try and make something that is not real, have realistic features. If it isn't alive, then don't try and make it look alive. Make it look cute.
 Embellish the hat if you wish. I added a piece of adhesive ribbon.
 Attach hat to the top and front of the card with a piece of double sided tape.
 Now for his face. I drew on his eyes and mouth with a fine point black pen. Again here is where it is really handy to not try and make him look realistic. Don't make the eyes evenly spaced and large, make them small and crooked, the dots for the mouth don't have to be the same size or evenly spaced. The nose is cut from a piece of fun foam but paper would work too. I used chalk for the cheeks.
 Now to add his scarf. Make a slit using an exacto knife just inside and towards the front of the card by the fold. The slit should be just wide enough for your fabric to pull through. Tear a long strip of fabric for the scarf and thread it through.
And thanks snow much to all of you readers for a great year!!!


Such a cute idea--thanks!! I'll have to file it for next year. Amazingly, ours are done already!
ReplyDeleteCute!!! I'm going to be trying this.
ReplyDeleteAdorable!! I'm new to cardmaking, but think I could do these. Thanks.
ReplyDelete