
 Back when I did my first giveaway of 2 fabric baskets I had a few people ask me for a tutorial on how to make these. The idea is not originally mine. I got it from the blog Pink Penguin. But I did alter it a bit and since I was going to make a couple of these as a gift I thought I might as well turn it into a tutorial.
 For the large basket (the one I made in this tutorial) you will need to start with 2 pieces of fabric 20X22 inches. I would not recommend making one larger than this unless you can find a way to make it more stable. But I am not saying that is not possible. I used a light weight canvas for this basket. This worked perfect for the outside and the lining. If I was using regular cotton fabric I would use canvas probably for the lining for stability. You will also need a piece of batting this same size. For the handles you will need 2 pieces of fabric 12X3".
Recap:
2 20X22 pieces fabric
1 20X22 piece of batting
2 pieces of fabric 12X3 for handles. Step 1 fold your piece of fabric in half lengthwise right sides together (so that it will now measure 22X10.) Press with an iron on the fold to form a sharp crease. Open it up and fold each end in to the center crease and press again so that you will have 3 creases now. These will act as guides for sewing in the next step.

2 pieces of fabric 12X3 for handles.
Step 1 fold your piece of fabric in half lengthwise right sides together (so that it will now measure 22X10.) Press with an iron on the fold to form a sharp crease. Open it up and fold each end in to the center crease and press again so that you will have 3 creases now. These will act as guides for sewing in the next step.
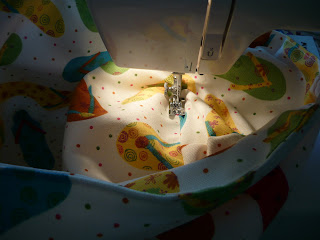
Step 2: Unfold your fabric and place the batting on the wrong side of the fabric and pin the sides. I hate the kind of batting that I am using for this project but I was all out and this was the affordable stuff at the store at the time. Never again!!!! It just stretches way too much. But anyway pin it just the same. Now using the creases on the right side of the fabric as a guide, stitch along the 2 outside creases (not the one in the center, though that wouldn't hurt).
 Step 3: Now fold the piece of fabric w/ batting attached right sides together and pin the 2 side edges. Sew these at 5/8". Trim off the excess with pinking shears.
 Step 4: Next you will box the corners. To do this pull out the bottom corner of the bag and fold the side down inside the bag (I use the center crease as a guide where to match up my side seam). Measure up 3 inches from the point and mark with a pin or pencil. I marked mine with a pencil and then used a ruler to draw a straight line. Pin along this line to hold all pieces together and sew. Repeat with the other side.

 You will have something that looks like this. Now trim off the excess and turn the bag right side out.
  Step 5: Now repeat all of these steps with the other piece of fabric (minus the batting step).
Step 6: Place the basket piece with the batting inside the other basket piece (right sides together) and pin the top edge matching up your seams. Sew around this top edge with a 1/4' seam leaving an opening about the size of your hand. Make sure you backstitch on each side of the opening.


Step 7: Turn the basket right side out, pushing the lining down inside. Iron the top edge flat and tuck under the edges of the opening and pin closed. Sew around the top edge as close to the edge as you can.

Step 8: To help hold the lining inside the basket I sewed along my boxed bottom edges through both layers.
Step 9: Now make the handles. Take one piece of handle fabric and fold it in half wrong sides together. Press with the iron. Now open this piece up and fold each edge to the center. Now fold it in half to make a skinny strip. Top stitch each side of this strip at 1/8".


Step 10: Fold under about 5/8 inch on the top of each handle and pin the handle to the side of the basket. I measured 2 inches from each side of the center side seam and pinned. Now sew around the top of the handle in a square to attach it to the basket. Repeat with the other side of the handle and the other side of the basket. And it is finished. You can make any size of these using the same steps.


I think you are a mind reader!!!! My kids need more baskets (really, they don't but I think they do) and this is great!!! Thank you SOOO much
ReplyDeletethanks I also was just thinking my kids need some of theses!
ReplyDeleteGreat tutorial!! I posted a link on Craft Gossip Sewing: http://sewing.craftgossip.com/tutorial-sew-a-small-fabric-basket/2009/06/19/
ReplyDelete--Anne
I really like your take on this! I'll be linking.
ReplyDeleteCute tutorial! I love the fabric you used.
ReplyDeleteAnother great tutorial for something that looks way above my sewing abilities. I have got to get back on track with learning to use my machine so I can make fabulous stuff like this! Why didn't I have you for home ec?
ReplyDeleteThank you for sharing this!
ReplyDeleteSuch a great tutorial. Thank you!
ReplyDeleteI've been looking for something like this, its so cute! Thank you. I'm your newest follower
ReplyDelete