Showing posts with label Organization. Show all posts

Feb 26, 2013

Lessons From A Dollhouse


I have noticed from my google stats that I get the most views on craft project related posts but I have to say that since I am trying to keep it real this year on my blog if I was to only post tutorials everyday then that might lead you to believe that I actually have time to craft everyday and that simple is not true.  I am a mom first and then a crafter so I hope you will bare with some of the "other stuff" I have to say here on Small Fry.

Today I wanted to share 3 lessons I have learned over the years from my kids and their toys.

Lesson #1: 2 years ago I bought this wonderful vintage doll house set for Small Fry for Christmas.  I knew she was ready for a dollhouse but part of me also bought it because it was so stinkin cute and exactly what I would have loved as a little girl.  I got accessories, people and even a van to go with it.  I had everything perfectly set up on Christmas morning and she was ecstatic about it when she saw it but it was only a matter of minutes before I could feel my pulse increasing and my stress level rising as she proceeded to completely "trash" the whole set up as she played.  She didn't keep a single thing in it's "right" place and when she was done, everything was out of the dollhouse in a pile on the floor.  I didn't get mad but I was shocked.  How could she "wreck" the perfect dollhouse set up?  Why did she have to put the bed in the kitchen and the toilet in the living room?  Why did every single person have to be shoved in the swimming pool?  I did what every OCD mother would have done as soon as she went to be: I set it all back up.  And (because I am sometimes a slow learner) I did the same thing every day for a long time.  She would ask me to play and I would put everything in it's "proper place" before I would start.  She played with it quite a bit.  Usually everything ended up in a heap in the bins beside the house.  I would try and let it stay there until I could resist no longer and fix it all.  Eventually she just stopped playing with it.  I guess in retrospect I don't blame her with a mother always coming in and "messing" up the way she had it.  It sat unused for a while.  Finally I decided that maybe we just needed a break from the dollhouse so I packed all the accessories in a tub and folded up the house and put it in the kitchen so I could take it to the basement for a while.  I didn't get it out of the house immediately so it just sat against the wall for a couple of hours and do you know what?  This happened: the girls completely rediscovered the dollhouse.  You can't believe how much they play with it now.  It sits on top of the accessories tub until they want it down, then we unfold it and open up the box and they play play play.  And when they are done they shove everything back into the tub, slide it over and put the dollhouse back.  That is when it occurred to me that the secret to the success of this toy and any other toy is to let go of my idea of how it is supposed to be used and what it should look like and to let my kids use their imaginations to play however they feel and to be positive and complimentary at the things they come up with-I mean it would be handy to have a toilet by the oven in the kitchen in real life too.

Lesson #2: Maybe this happens at your house-you feel (as the parent) that you are living in the midst of a toy store with things scattered all over the place and yet the kids don't seem to want to use any of them.  You say, "go play with that new doll we got you" or "go play with those building blocks" or "go play with the toy kitchen" and your children seem to stare at you as if you were off your rocker.  This took me a little while to get-and consequently I have been known to buy unnecessary "new" toys to help my children have something exciting to play with-but did you know that your kids probably don't need something new at all?  When my girls stop playing with something for a while I know that it means we need to rearrange.  Yep-it is that simple.  Nothing new, no new accessories-simply moving the toys to new spots and it is like they are brand new all over again.  We have an awesome play kitchen and it has been in multiple spots in our house because when it gets boring in one spot we move it and it becomes something entirely new.  Just a month ago I simply turned the kitchen a different direction, added a little shelf for foods and the "Strawberry Cafe" was born and it has been well used and loved since.  And if you have limited space try switching things into a new box or bin, rearranging a shelf or sorting toys into new categories.  Even these little changes can reignite interest in toys.

Lesson #3: Putting things away and trading.  I am sure lots of you have read about toy rotating.  I don't do this exactly-because we actually have a base of 4 different sets of toys that the girls really like but I do swap out certain items on occasion   I will put away one item and then if the girls want it back they have to trade in something else to take it's place.  When they want the barn from the basement they might trade in a cash register or a doll in it's place.  Then they get some "new" from downstairs and play with it until it is time for it to go back.  It is an easier version of toy rotating that helps to keep toys fresh and new.

So before you give up on a toy perhaps you should try putting these 3 ideas to the test: letting go of your version of how it should be used, move it to something play new or trade part of it or all of it for something new for a while.
Pin It!
Print Friendly and PDF

Feb 25, 2013

Alternative Uses for a Turn Table

One of my favorite finds at a thrift store are these plain old plastic turn tables (you know-the ones you use to organize your spices in a cupboard).  I love to find them, and always have to buy them because there are so many different uses for these.  Today I complied a little post of "alternative turn table ideas" to share with you.
1. Your fridge.  I actually saw this one on Pinterest and thought it was genius.  How many times does a random jar of jam get shoved to the back of the fridge and forgotten?  This picture proves just how many partly used, random jars one might have in their fridge.  Coral them all on a turn table and save yourself some wasted food and money and make getting what you need from the fridge that much easier.
 2. The medicine cabinet.  This basically goes along with the fridge idea.  Sometimes you can get so many different bottles and boxes of medicine in your cabinet that you can't ever decide what to use when you look into it with a super stuffy head or are suffering from a major cold.  Organize them by type, or adults and kids medicines, boxes or bottles.  Whatever categories you like-this really helps to clean up a small space like a bathroom cabinet.
 3. Now if we are talking about disorganized spaces in need of corralling then how about a beside stand drawer?  You won't even believe how this looked before (nor am I brave enough to show you) but putting a little turn table/lazy susan in a drawer makes it much easier to keep things where you want them (by adding a little jar or container to hold- in this case chapstick, nail clippers and lotions) and prevents the all to easy habit of opening and just chucking everything in the drawer at once.
 4. I hate to burst your bubble if you think that I live in a home in which even the bathroom cupboards are beautiful, but in this house that is just not the case.  The point of this picture is to showcase my second favorite turn table uses: corralling cleaners.  It is amazing how much more organized one little space can feel when you put 5 bottles on a rotating rack rather than lined up all over the place under the sink.  This makes finding what you want super easy-no more bending in half to see just where you put that bottle of cleaner.
 5. How about keeping track of small appliances like your iron and in this case my glue gun because I use this in my craft room.  I keep the cords folded up and tucked in an empty toilet paper roll and have this up on a shelf making it easy to grab what I want and this helps to keep these things out of the way of my work area.
 6. When thinking about this post it came to me that if I could use a turn table to organize medicines or condiments then it would probably work perfectly to organize baby supplies on the change table too.  My change table usually looks like a disaster zone with diaper creams and lotions and teething medicine and cotton swabs shoved where ever I could find a place in the midst of changing diapers.  This is a perfect solution-and again you could use more than one and organize by category and also could use little containers to hold small items. 
 7. Finally my favorite use by far: organizing craft room supplies.  This one double turn table eliminated 3 boxes and 3 random containers of supplies.  Instead I used mason jars to hold clips, glass rocks, and small wooden pieces and uses small glass jars to hold brads and eyelets and finally (thanks to an awesome suggestion from my friend) I used breast milk storage bottles to organize and categorize all my colored buttons.  Now a simple turn and I can find just what I need without having to open and unstack a bunch of little boxes or riffling through a bunch of containers.  It doesn't take up a lot of room and it is super functional.

There you have it-my list of 7 alternative uses for a turn table.   Keep your eye out for these-they are much more functional than you may have thought.
Do you have any other place you have used one to help with organization in your home? 
Pin It!
Print Friendly and PDF

Nov 28, 2012

Keeping Memories: Made Simple Part 4

I wanted to share one final installment in my keeping memories series.  I was going to stop at 3 but I felt that these last ideas just needed to be shared.  

Idea #1: The Day You Were Born Albums
I got this idea after Small Fry was born.  It was inspired by two things: an 8x8 album I found on clearance at Walmart and a ton (and I mean a ton) of pictures from the hospital of both the day she was born and the following day.  I decided to make an album completely dedicated to those 2 very special days.  I loved the way it turned out so much that I made one for every child.  They are very simple.  I buy a scrapbook paper pack that is a theme I like, a few embellishments, and just hand write all the notes.  
 This is a look at Mr. T's (my sweetpie boy) album.  In his case because I felt like I was waiting forever for him to arrive I had the whole thing made before he was born and then just had to add in the pictures and the captions afterwards.  I was able to make all of my kids' albums within the first week after they came home because I kept them as simple as possible.  The girls love looking at theirs and seeing themselves as a baby.

 Idea #2: Keeping Cards
This could be done with birthday cards or Christmas cards.  In the case of this picture this is a stack of cards my husband has given me over the years.  He isn't always good at verbally saying how he feels but he buys the most wonderful cards for me all the time and they are a treasure to me so I want to keep them all together in a safe place.  I punched a hole in the corner of each card and put them on a ring.  I keep them tucked away in my keepsake drawer.  So before you toss a card that comes in the mail consider the message on it...because it could be a treasure.

 Idea #3: Kids journals
These are your basic composition books (I bought them at the Dollar Store).  I covered them with some cute paper and added my girls names.  In these I write letters to my kids.  I don't do it nearly as regularly as I would like but I try to write something down especially when they have done something funny or brave or have had a birthday or been in some other special event.  I try to keep them about positive things but occasionally I write when it has been a rough day and I have felt frustrated and I write about how I have felt but express my deep and never ending love.  I write them in letter format starting with "Dear..." and ending with "Love you. Mom".  These are something that I want to keep up for as long as I can and of course I want to add one for my Mr. T.  I hope they will be both a treasured keepsake for my kids but also a teaching resource for when they become parents.

 Idea #4: Family Gratitude Journal
I got this idea when I was at my parents house this spring for a talk given at church on journaling.  The man mentioned that his family kept a gratitude journal and that idea hit me so strongly that we needed to do the same thing.  We write in it every Monday night as part of our family home evening.  Each family member (and friend or extended family member-who ever is there at the time) gets a turn to share what they are grateful for.  At first when we started the girls could hardly think of a thing to share.  It was kind of frustrating because we did all kinds of things, there were friends and family get togethers, trips out of town and to the park, birthdays and other celebrations and they would always say, "I am thankful for the yummy dinner." Sometimes we would try and prompt them with ideas of things to be thankful for but then I felt like we weren't teaching them to think of and find things on their own.  So we just went with it and they have come a long way.  They are learning to think back and remember things better and it is so fun to hear the things that stand out to them which we often miss.  I am super in love with this idea.


Idea #4: Digital Scrapbooks
Even though I am not good at scrapbooking I do love the look of well planned and put together pages.  I still don't have the time for it though.  I know some people are die hard paper and glue scrapbookers and don't like the look of digital scrapbook pages at all but I am not one of those.  I think that there are so many beautiful ideas in the digital scrapbooking world that I want to try them all.  I made these pages using Smilebox.  It is one of the simplest digital scrapbooking companies out there (you can make cards, collages, DVD's and more with their program).  These "albums" are 8 pages long.  You choose a theme, add in pictures, type in text and are given the ability to change the colors and embellishments somewhat.  I can literally do one start to finish in less than an hour.  If you have a payed membership then you are given the option to print them at home or send them off to print.  I print mine through Sam's Club and they end up costing about $11.00.  I always keep my eye open for 8x8 albums on sale and buy one for each kid.  I make these after the kids have had a birthday or when we do something special with one of the kids.  I still include these pictures in a family photobook but this way each kid will then get a copy of their own special events.

 Idea #5: Kid Binders
I started these because I was getting a stack of papers that the girls had drawn or little projects they had made, plus pictures that I once had framed and then I updated them and didn't know what to do with the ones I had taken down, and just odds and ends that I wanted to keep for my kids but I didn't know where.  I do have memory boxes for each kid that I keep baby clothes, first shoes, special toys, first blankets and stuff like that in but I wanted something to keep the papers in so I made these simple binders.  They don't have much rhyme or reason to them but I try and label the things with at least a date on them as best I can.  I also don't keep everything because that would be impossible so I just keep some of the cutest.
 Another thing that I put in these are Valentines "101 Things I Love About You" lists that I write for my kids each year.
 I also try and include regular pictures of things like handprints that show how much they are growing.
Pin It!
Print Friendly and PDF

Jan 26, 2012

Repurposed OJ Bottle for Craft Storage

Doesn't everyone need more storage containers in their craft room?  I am in desperate need.  I guess that is why this:
 Caught my eye and got me thinking-that would be a prime storage container.  The idea was inspired by this tutorial over at Make it and Love it.  I basically followed her same technique only on a bigger container and then I added my label to the front.  The inside is painted with craft paint.  I tried spray painting it but it did not cover well at all.  The craft paint went on really nice.  I am saving orange juice containers so I can make a couple more to match. 


Pin It!
Print Friendly and PDF

Jan 25, 2012

Homemade can rotating system...the upgraded version

After posting this on my blog last week: (a can rotating system made from a soda pop box)
 my friend called and asked if it was able to hold two layers of cans?  She said she had success with one holding two layers of soup cans but wondered if it could hold two layers of canned beans, corn, tomatoes etc.  You know the 15 oz sized cans.  I said it could not but it hadn't even dawned on me that there was probably a way to make it so that it could hold more cans then the 7 that could already fit in it.  So my mind began racing and during nap time I used a soda pop box, some cardboard and a whole lot of duct tape and created this:
It successfully holds 11 cans and rotates pretty darn slick.  I was planning on making my creation into a tutorial as I went but I soon looked at my creation and realized it looked like a 5th grade science project and needed to refine the process and figure out a way to use a lot less duct tape before the tutorial so stay tuned folks. There is hope.
Pin It!
Print Friendly and PDF

Jan 24, 2012

Divided Wire Basket With Labels Getting Organized Part 4

This is the last of my getting organized desk or home office set-a divided wire basket with labels.
For this project you need:
1 of these wire baskets (though you could probably accomplish something similar with another kind of basket)
Heavy cardboard
Fabric scraps
Pellon ultra firm stabilizer scraps
Labels printed on fabric (leftover from the previous projects)
Sticky backed Velcro

Start by measuring the width of the basket.
Next measure the height
Cut two pieces of cardboard with those dimensions.
Place the cardboard in the basket like so:
Using one of the side wires of the basket trace the correct angle on the cardboard.
Cut with a sharp knife and fit back into the basket.

On the angled side mark two dots for holes an inch from the top and bottom.
Punch holes with an eyelet tool or a large nail.  Spray paint the cardboard pieces to match the basket or your decor.
From the fabric scraps cut 3  3 1/2" squares (or as many as you want labels).
Fold it in half right sides together.
Stitch along one side and the top.
Turn right side out.
Insert a small piece of ultra firm stabilizer (3 x 1 1/2").  Iron to the fabric label.
Tuck under the open edges.
Pin in place as well as pinning a piece of ribbon 4" long  (folded in half) on the top.
Sew around all 4 sides catching the ribbon.
Iron on the label printed on fabric.
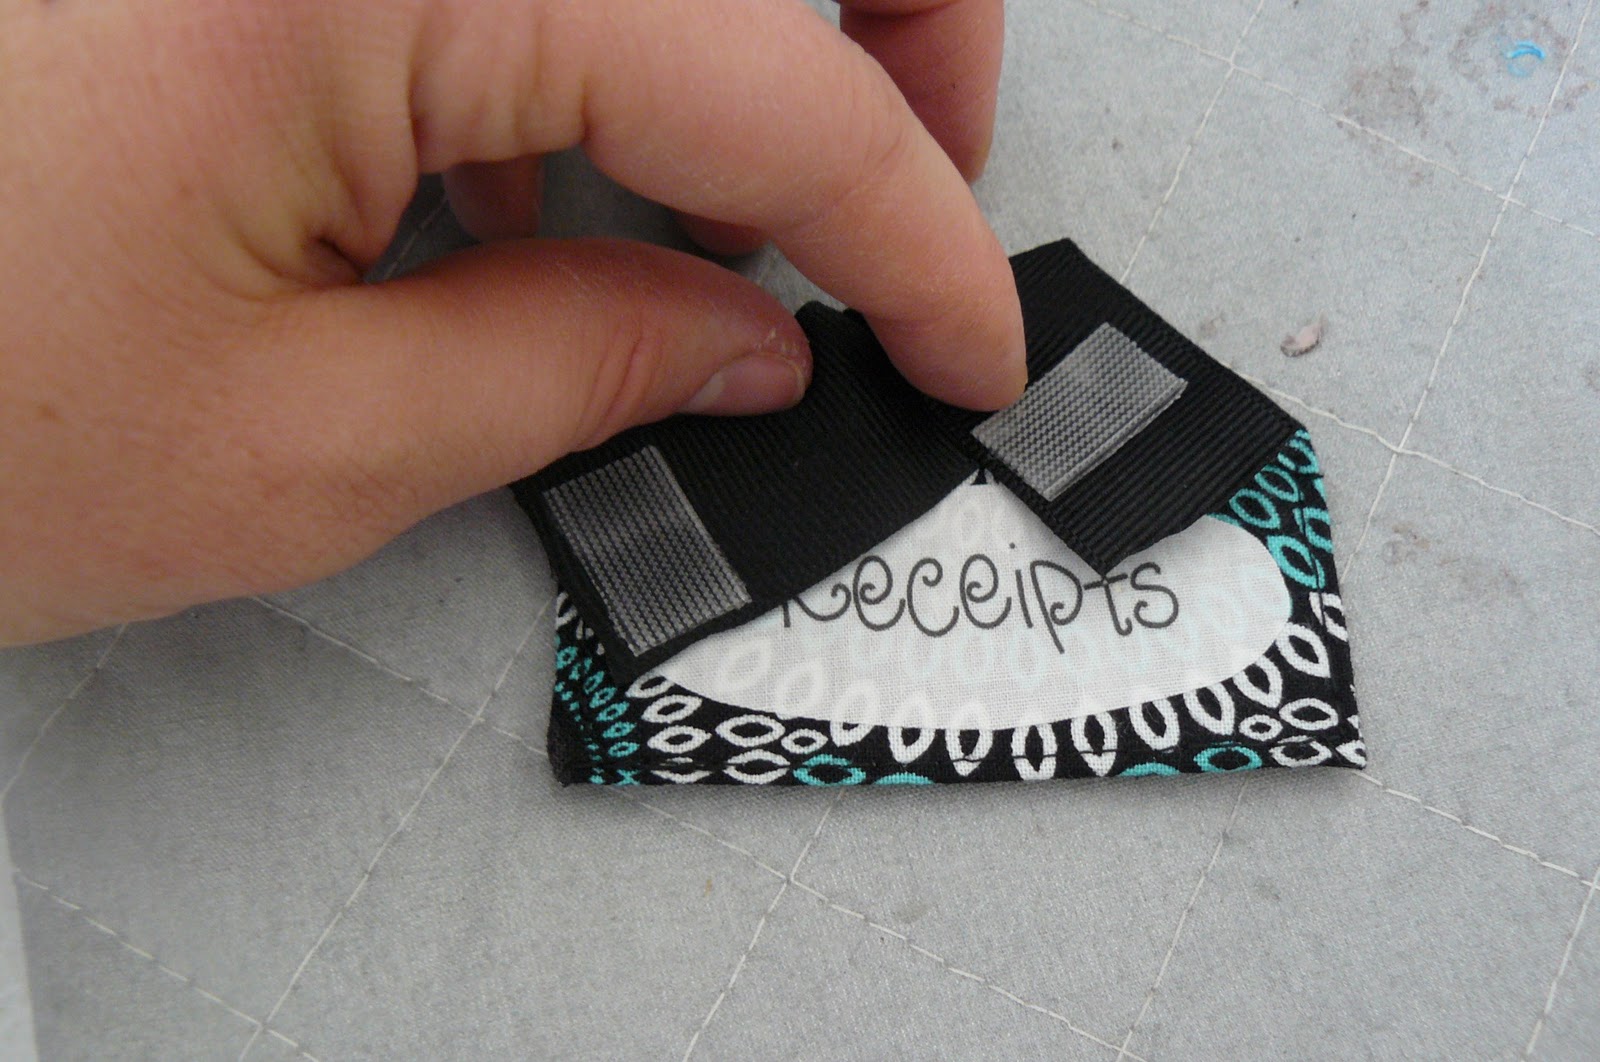
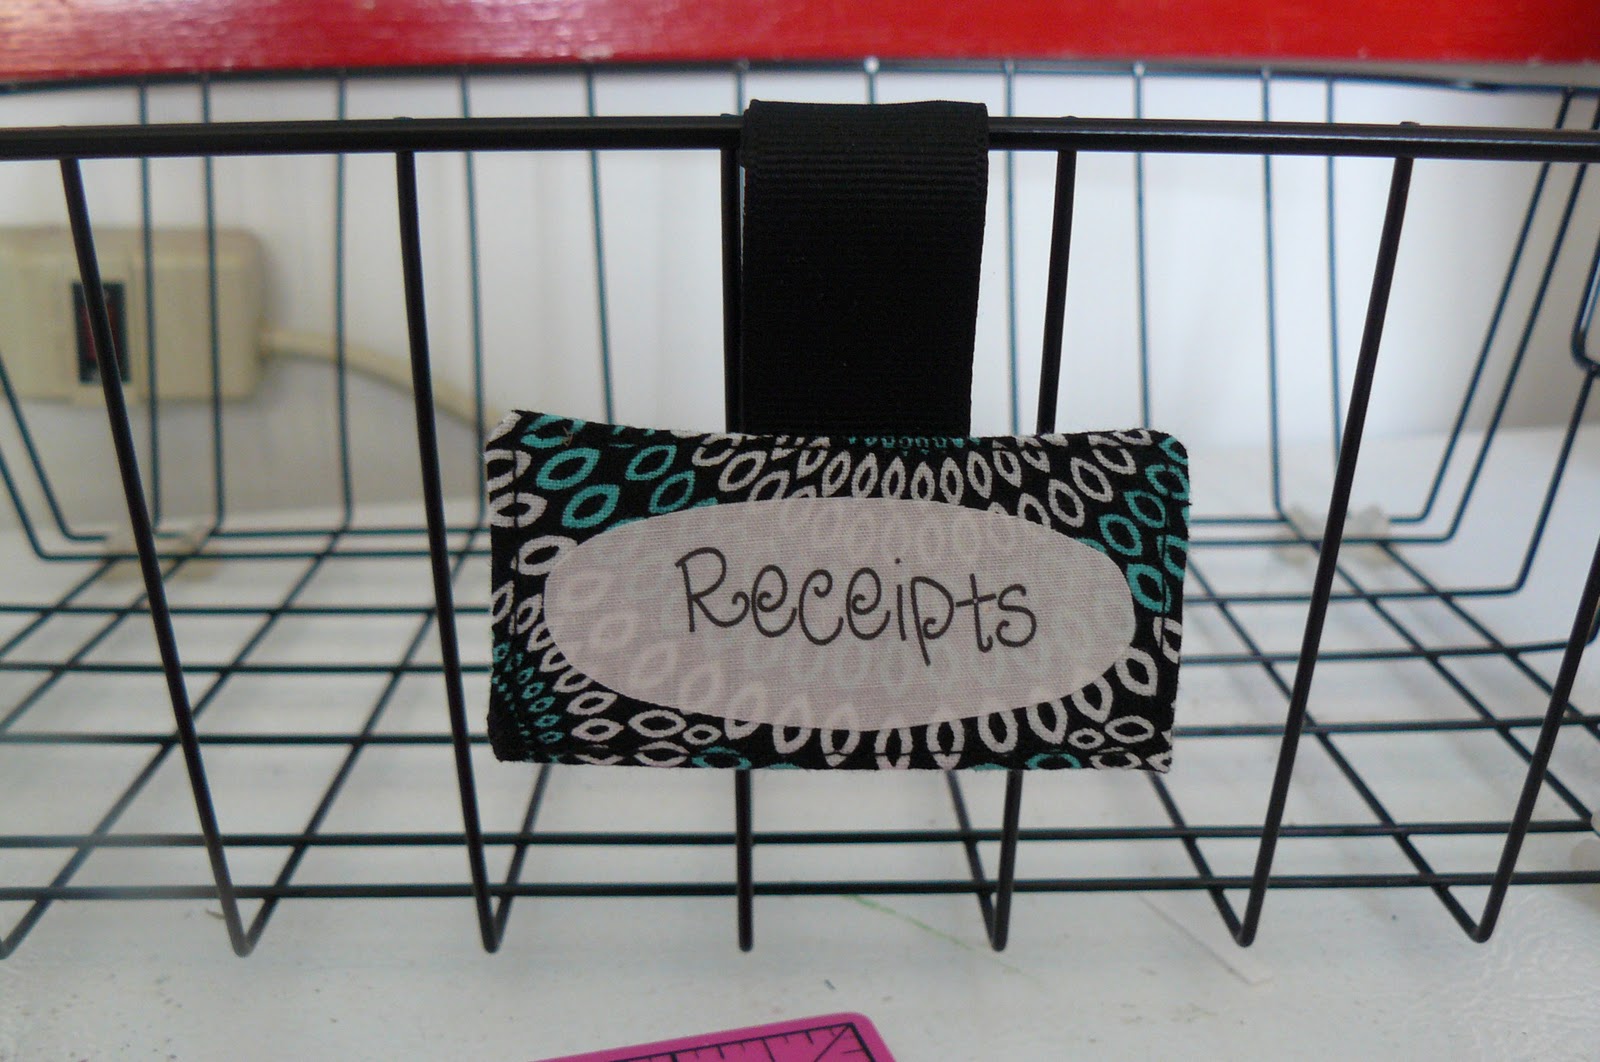
To attach it to the basket I added two small pieces of  sticky Velcro.

And here is the finished product.  The cardboard pieces are tied on with pieces of coordinating string.  It is a quick and easy upgrade of a plain old basket.

Pin It!
Print Friendly and PDF

Jan 17, 2012

These ain't pretty but they are functional - Make Your Own Can Rotating System

I have seen these on Pinterest-they are a little more dolled up than mine but the basic idea is the same.  SIDE NOTE: when you become a repurposing craftaholic it is hard to let any good garbage go and you end up with a pile of "junk" in the corner of your craft room just waiting until you are inspired to make something.  It is kind of a bit of an obsession.
Well we had these boxes left over after Christmas.  I decided to give it a try and make a can rotating system.  I taped up any distressed areas or weak areas with duct tape.  I cut a hole in the back at the top wide enough for a can to fit in.  I cut two pieces of cardboard the same width as the box and taped them to the bottom underneath the back (to give it a bit of an angle and make the cans roll).  I was going to spray paint the whole thing and decorate it up but then I decided not to waste my time.  It is going to be in the basement holding western family tomatoes for heavens sakes.  Who needs fancy.
 The whole thing holds 7 cans.  Now 7 cans is nothing if you are trying to establish food storage but I told my husband that if we just learn to always take the first one in the box and keep adding to it after we take one then at least we can be better about eating the old first and keep our food supply rotating.
 Now I feel like raiding peoples porches, trash cans and fridges to get more so I can line my shelves with them.  It was super fast to make-about 5 minutes total and very functional.  A good thing-as Martha would say (though she would probably shun the whole project for not being appealing to the eye).
Pin It!
Print Friendly and PDF
Related Posts Plugin for WordPress, Blogger...