This guy was inspired by a snowman my husbands Aunt has in her home. I have admired it since we had our 3rd date (which was to his families Christmas party). I don't dare ask if I can have it so I had to find a way to recreate my own. I was at our thrift store one day when these tacky things caught my eye:
Materials:
pair of jeans or other pants
black embroidery floss
orange felt
batting
rocks or a bag of wheat or corn as a weight
hot glue gun
black felt
twigs for arms
Step 1: Begin by cutting the pant leg off right at the crotch line.
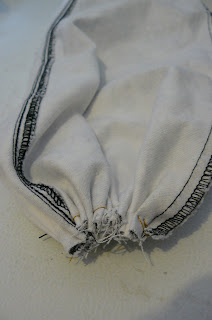
Step 2: Cut the leg into the desired length. Because the pant leg was not that wide I didn't want the snowman to be too tall because it would make it look out of proportion. I cut off about a 8 inch piece from the ankle end of the pant leg.Step 3: Using a heavy weight thread and a heavy weight needle sew a running stick all the way around the wider end of the pant leg piece. Pull to gather it tight and then add a couple of extra stitches to hold it together.
Step 4: Turn the piece right side out, add your weights to the bottom and stuff the remaining space (not too full because you want to be able to manipulate it a bit).Step 5: Run a bead of hot glue all the way around the top edge and pinch together. I added a couple of clothes pins to hold it while it hardened.
Step 6: While the glue is hardening portion off your snowman using rubber bands (the tighter the better because it will help you tie off your sections in a minute).
Step 7: Using the black embroidery floss loop your string around the snowman where the rubber bands are and tie pulling tight (it helps to have 2 people to do this but if you don't then pinch the snowman where the rubber band was and loop the string around and pull tight-not going to lie-this is the hardest part). If it is not as tight as you would like then cut the string and try again. If you have black yarn or even a floss it might work a bit better because it would be stronger.
Step 8: Thread another piece of embroidery floss through a needle and double it over and tie a knot at the end.Step 9: You are going to make the eyes now. Come in through the upper part of the head (the part that will be hidden by the hat) and pinch your fabric and come out where you want your eye to be.
Step 10: Pull the thread until you reach the knot. Now wrap the thread around the needle (close to the fabric about 5 times). Poke the needle back into the fabric (pinching it again) and out the top. As you pull the needle through guide the remaining thread with your other hand as it pulls through to create a knot. If this is all too complicated for you (and I am sure my directions are not helping) then glue on some buttons and call it good. When I do knots I plan on cutting it off and redoing it at least 2 times-just is that way. This is how the knot should look.
Step 11: Repeat for the second eye. Then add blush (I used chalk) for the cheeks and a carrot nose (free handed it). Glue the nose on with hot glue.
Step 12: Making the hat. Cut out a piece of black felt about 6-8 inches wide and long enough to wrap around your snowman's head (sizes will vary based on how big yours is).
Step 13: Fold this piece in half and stitch one edge (or hot glue it).
Step 14: Now place the hat on the snowman's head and pull down as far as desired. Glue in place.
Step 15: Tie off the top of the hat with another piece of embroidery floss.
Step 16: Add a hat brim by gluing a second piece of felt (about an inch wide) all the way around the bottom of the hat. I also cut a 2 inch wide piece (and length again depends on your choice-mine was about 20 inches long) for the scarf. Wrap around, tie and glue in place.This is how he should look so far. He looked sad so I decided to give him some arms to see if that would help.
Step 17: Find your branches or twigs for the arms and spray paint black if desired. Cut a small hole using a really sharp pair of scissors in the desired spot. Put a dab of hot glue in the hole and add the twig. Hold in place until firm. Repeat on the other side.Tada- a very fashionable snowman indeed. He still looked a bit forlorn so I decided he needed a love in his life.
I used the other pan leg to make him a wife. He seemed to perk up a lot more after that.


oh my goodness!! I have a thing for snowmen... and I LOVE this!!! :o)
ReplyDeleteThis turned out really cute!
ReplyDelete