Jun 16, 2011

Toddler Beach Towel Poncho

My kids love to swim but they don't love getting out of the water and feeling cold.  I wanted to create a towel that would be great for my little swimmers that would easily stay on them, help them get dry and keep them warm.  This tutorial in particular is to make a towel poncho for a small toddler (my little pumpkin is about a year and a half).  If you wanted to make a similar thing for an older child you would need to start for sure with a bigger towel, or sew on additional material to a towel this size in order to make it fit.  This towel would be too small for my 3 year old.
Okay, lets begin.
Materials
1 bath towel 53 1/2 x 29" (isn't that a random towel size?)  This is your standard bath towel
1 hand towel 15 x 24
5- 2"x 72" strips of fabric
1- 2" piece of 1/8" elastic
1 button
1. Begin by laying the large bath towel out flat and cutting off a 5 1/2" strip from one end.  I cut right along one of the patterned lines on my towel.
2. Next take the edge that you just cut and fold it over on the towel like this to form a triangle (when you cut this it will form a perfect square).
3. Cut along the side of your towel that is adjacent to the remainder of the towel to get a big triangle.  When you open it up you should have your square.
4. Now you are going to bind each of the towel edges.  I did a super easy (could be considered cheaters) method.  I am not a fan of sewing with bias tape, nor did I have enough fabric to create my own bias fabric strips so I decided to just use regular fabric strips and sandwich each of my towel edges between one (so you would see an inch of fabric on each side).

5.  Then I sewed a 1/2" seam down each strip.  I cut the fabric towards the seam on each strip after (in about 1/2" increments).  Once this is washed it will fray.  I like the look-plus it is simple and easy.  I think binding each edge neater with bias binding would look fantastic.  So you have two options.
On the corners I just left the ends of each strip raw (I didn't fold anything under).
6. Now we will sew the hood.  Begin by cutting your hand towel down to 22 x 9 1/4".
7.  Sew a strip of fabric along one long edge.  I used the same method that I did on the large square.
8. Fold the towel in half (right sides together if you have a right side) the width way.  Pin the opposite side of the one with the binding.  Stitch a 1/4" seam along that whole edge.
When you turn it right side out you will have a cute pointy hood.
Back view.
9. Next to be able to attach the hood and make an opening for a cute little head you will need to fold your large square piece to form first a large triangle (so fold it corner to corner), then in half again to form a smaller triangle. (this picture shows it open so that you can see that I folded twice).
Here it is closed.
10.  Find the center point (so if you opened your triangle up, the center point would be in the top middle).  Measure about 10" one way and mark with a pin (make sure you are staying on the center fold as you measure, don't measure down the side.  The center fold is the part that will slip over your kids head and rest on his or her shoulders.  I so wish I was a mathematician because I am sure there is some sort of mathematical way to explain this).  Flip the whole triangle piece over and mark 10" out from the center point on the other side.
11.  Using a sharp pair of scissors, poke one point in at the center and cut along one side to the pin.  Then repeat on the other side.  On one side (not both) cut an extra 2-3 inches.  This is going to ensure that the hole will fit any size of head.
This will leave you with a large opening in the center of the towel.
12.  Bind the edge in the same manner that you did the sides.

13.  Now you will adjust the hood so that it will fit with your opening.  To do this I made a series of pleats.
14.  The pleats are simply made by pinching the fabric
and then folding it down to one side.  Keep all your pleats going the same direction.  I have mine going out from the center.  Start on the outside edge first and then work towards the middle.  You could make a few large pleats, or many smaller ones.  Pin each pleat and then measure it against your opening to make sure it fits. You want it to fit the 20" opening-not including the extra 2 inches on one side.
15. To pin it on, lay the hood with the right side (which is the outside) of the hood (the back center seam) on the back side of the towel, about a 1/2 inch down from the opening edge.  Match the edges of the hood to the size of the opening.  It should be 20".  Pin in place.  There should be 2-3 extra inches on one side.  Sew along the edge of the hood.  After you have done that, pull the hood up, pressing the opening edge of the towel up over the bottom of the hood.  Pin in place and sew again along the edge of the opening piece.  This will cover up the raw and unfinished edge of the hood.
16. Lastly I added a button on the front side of the towel (I placed it where the 20" end and the extra 2-3" begins (see second pic below to clarify).  On the opposite side (which is the back side of the towel) I sewed a small loop with the piece of elastic.  This will help hold the towel on a little body after they have put it on.
And now for my adorable model.


Happy sewing and swimming everyone.


Creative Itch
Pin It!
Print Friendly and PDF

Jun 15, 2011

Window Screen Beach Bag

This is the second version of a beach bag-that will hold all your beach essentials but not all the sand.  This one is made from window screen.  I am not the original creator-once again Martha Stewart beat me to that, but this one is completely my own version (and I must add much cuter than Martha's).  I bought a roll of screen at the hardware store for $9.00 (I bet you can find it much cheaper where you live).  I have enough to make about 6-8 beach bags and replace the screen on our window so I think it is worth it.  Beach bags anyone?
Anyway for this project you will need:
A piece of screen 18x20" (see pics and notes below to learn how I cut mine).
2 pieces of fabric 2 1/4x72"
2 pieces of fabric 4x20"
4 pieces of ribbon 6" long
1 piece of ribbon 35 1/2" long
1. I began by rolling out my screen on my rotary cutter matt.  I then folded it over (matching up the sides which are straight) until I got a piece that was 20" in height.  I cut along the screen at the 20" mark (through both layers). 
2. Then I cut that piece in half to get two pieces that were 18" wide.  The screen cut perfectly with the rotary cutter.
3. Leaving the piece of screen folded in half, pin the sides and sew both with a 1/2" seam. 
3. Now along the top edge fold the screen over 1" and (still wrong side out) then again a second time.  Screen is not like fabric it doesn't want to stay in place on it's own.  I found it was easiest to do a little section at a time, fold it twice and pin and then move over and repeat. 

4. Now sew along the bottom of the top hem.
5.  Prepare the fabric pieces for the straps.
6.  Fold every strap piece in half (lengthwise) and sew along the open edge.
7.  Turn the strap pieces right side out and press flat so that the seam is in the center back.  You will have to refold them in order to do this.
8.  Cut all your pieces of ribbon.
9.  To prepare the loop pieces measure in 1 inch from each end and pin.  Now fold the ribbon in half lengthwise at the pin and repin it so that the layers are sandwiched together (like in the picture).
10.  Sew from one pin to the other.
Your finished piece should have a flat section on each end and be folded in half in the middle.  Repeat with the remaining 3 pieces.
11.  Pin the long piece of ribbon all the way around the top of the bag.  Fold under the end of ribbon where you are starting.  I always leave the end unpinned because I usually never have it pinned quite tight enough and it moves as I sew.  This will help you keep from having any bunching or folding.
12.  Before you sew down the top ribbon, you will want to place your little ribbon loop pieces in place.  I measured in, from the outside edge, 4 1/2".  This is where the inside of the ribbon should line up, with the other side of the ribbon lining up at the 5 1/2" mark.  (see picture)  Flip the ruler over and repeat on the other side of the front of the bag.  Once those are in place, you can flip the bag over and pin the other ribbon loop pieces to the back side (using the already pinned ones as a guide)

13.  Sew along the top and bottom edge of the ribbon.
14.  Onto the straps.  Begin by tucking the end of the thinner strap piece inside about 1/4".
15.  Place the thin strap piece on top of the wider one (but come down about 1 1/2 from the end).  Stitch over the end of the thin piece and backstitch.
16.  Now this is the cheaters method of gathering.  I don't have a fancy foot for my machine and I found the thin strap piece was too thick to gather in my normal method (basting stitch and pull threads) so as I sewed I used a small pair of scissors to push the fabric and bunch it, then I sewed over it and repeated all the way down.
The end result is not a perfect gather, but I like how it looks and it takes a bit less time.  Continue this process until you get about 2 inches from the end of the wide strap piece.  Stop and cut the thinner piece down so that once you have tucked in the end, it will be about 1 1/2" from the end of the strap. Tuck in the end of the thinner piece and continue sewing until you reach the end of the thin piece.  Backstitch and stop.
17.  After you have repeated this process with the second strap, tuck under about 1/4" on the end of each side of the wider strap piece.
18.  Starting with the ruffled side down, wrap the end of each strap piece around the ribbon loops on one side of the bag.  Make sure the strap doesn't twist.  Pin in place and then sew.  Repeat on the other side.

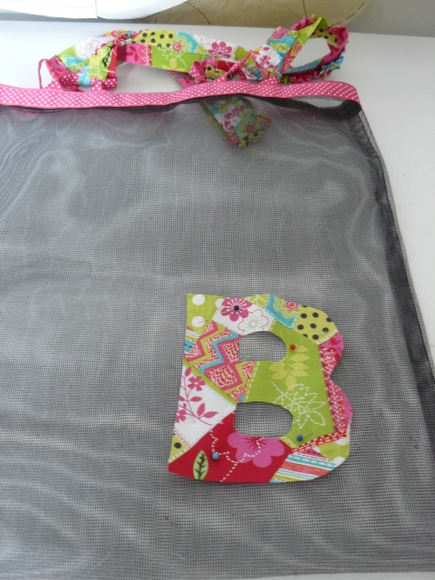
19.  Lastly a bit of decoration.  I found the bag itself was pretty plain so I added a large monogram to the front.  I printed out the letter in the font I wanted and cut it out of paper.
20.  Pin it on BACKWARDS on your fabric and cut.
21. Pin the letter where you want it on the bag.
22. Sew around the edge of the letter with a zig zag stitch.


Done and ready for the beach.  A great way to store your stuff with out storing the sand.  It is also a great bag to put your wet stuff in when you are done playing in the water.  It can begin to dry as your walk or drive. Not to mention the fact that it is pretty darn cute.  This is a great idea for reuseable shopping bags too.


Pin It!
Print Friendly and PDF
Related Posts Plugin for WordPress, Blogger...