Anyway for this project you will need:
A piece of screen 18x20" (see pics and notes below to learn how I cut mine).
2 pieces of fabric 2 1/4x72"
2 pieces of fabric 4x20"
4 pieces of ribbon 6" long
1 piece of ribbon 35 1/2" long
1. I began by rolling out my screen on my rotary cutter matt. I then folded it over (matching up the sides which are straight) until I got a piece that was 20" in height. I cut along the screen at the 20" mark (through both layers).
2. Then I cut that piece in half to get two pieces that were 18" wide. The screen cut perfectly with the rotary cutter.
3. Leaving the piece of screen folded in half, pin the sides and sew both with a 1/2" seam.
3. Now along the top edge fold the screen over 1" and (still wrong side out) then again a second time. Screen is not like fabric it doesn't want to stay in place on it's own. I found it was easiest to do a little section at a time, fold it twice and pin and then move over and repeat.
4. Now sew along the bottom of the top hem.
5. Prepare the fabric pieces for the straps.6. Fold every strap piece in half (lengthwise) and sew along the open edge.
7. Turn the strap pieces right side out and press flat so that the seam is in the center back. You will have to refold them in order to do this.
8. Cut all your pieces of ribbon.
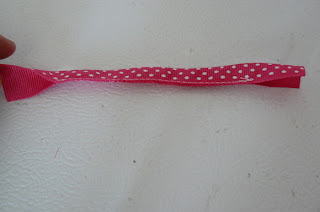
9. To prepare the loop pieces measure in 1 inch from each end and pin. Now fold the ribbon in half lengthwise at the pin and repin it so that the layers are sandwiched together (like in the picture).
10. Sew from one pin to the other.
Your finished piece should have a flat section on each end and be folded in half in the middle. Repeat with the remaining 3 pieces.
11. Pin the long piece of ribbon all the way around the top of the bag. Fold under the end of ribbon where you are starting. I always leave the end unpinned because I usually never have it pinned quite tight enough and it moves as I sew. This will help you keep from having any bunching or folding.
12. Before you sew down the top ribbon, you will want to place your little ribbon loop pieces in place. I measured in, from the outside edge, 4 1/2". This is where the inside of the ribbon should line up, with the other side of the ribbon lining up at the 5 1/2" mark. (see picture) Flip the ruler over and repeat on the other side of the front of the bag. Once those are in place, you can flip the bag over and pin the other ribbon loop pieces to the back side (using the already pinned ones as a guide)
13. Sew along the top and bottom edge of the ribbon.
14. Onto the straps. Begin by tucking the end of the thinner strap piece inside about 1/4".
15. Place the thin strap piece on top of the wider one (but come down about 1 1/2 from the end). Stitch over the end of the thin piece and backstitch.
16. Now this is the cheaters method of gathering. I don't have a fancy foot for my machine and I found the thin strap piece was too thick to gather in my normal method (basting stitch and pull threads) so as I sewed I used a small pair of scissors to push the fabric and bunch it, then I sewed over it and repeated all the way down.
The end result is not a perfect gather, but I like how it looks and it takes a bit less time. Continue this process until you get about 2 inches from the end of the wide strap piece. Stop and cut the thinner piece down so that once you have tucked in the end, it will be about 1 1/2" from the end of the strap. Tuck in the end of the thinner piece and continue sewing until you reach the end of the thin piece. Backstitch and stop.
17. After you have repeated this process with the second strap, tuck under about 1/4" on the end of each side of the wider strap piece.
18. Starting with the ruffled side down, wrap the end of each strap piece around the ribbon loops on one side of the bag. Make sure the strap doesn't twist. Pin in place and then sew. Repeat on the other side.
19. Lastly a bit of decoration. I found the bag itself was pretty plain so I added a large monogram to the front. I printed out the letter in the font I wanted and cut it out of paper.
20. Pin it on BACKWARDS on your fabric and cut.
21. Pin the letter where you want it on the bag.
22. Sew around the edge of the letter with a zig zag stitch.
Done and ready for the beach. A great way to store your stuff with out storing the sand. It is also a great bag to put your wet stuff in when you are done playing in the water. It can begin to dry as your walk or drive. Not to mention the fact that it is pretty darn cute. This is a great idea for reuseable shopping bags too.


Fabulous as always:) I think I have 20 of your projects bookmarked!
ReplyDeleteI am in awe with your genius!!!!! I wish I had many of your projects for when my kids were little and 'creative' with their sandbox. I'm gonna make this for my niece and nephew! Thank you for sharing you again are a genius!!!!!
ReplyDelete