


 I honestly can't remember where I first saw this idea. I think there are a lot of blogs/websites that have featured place mat purses. I thought if I found a cute enough place mat then I would try this. Well I did find a cute place mat. I found it at K-Mart for $3.99. Now that is a steal for a purse. Here is a tutorial to make one of these quick and easy purses. I love this idea.
 Step 1: Start with a standard size place mat. You want one that is not too flimsy but not too thick either.
 Step 2: Cut two pieces of ribbon for the handles. Mine were 17 3/4". You can adjust that length depending on how long or short you want the handles to be.


 Step 4: Sew the ribbon onto the place mat. I sewed first in a square and through the center of the square to make an X. Repeat this on the other 3 pieces.
 Step 5: Fold the place mat in half, right sides together and pin your side edges. Make sure the top edge is even too. Sew the side seams. I sewed 1/4" seams. Back stitch start and stop.

Step 6: Make the box corners. Open up your purse and flatten the side seams so that you get a point like this. 
Step 7: Pin the sides to hold the corner in place. Measure from the point up 2". Place a pin to mark that spot.


 Step 8: Sew a seam straight across from one side to the other at that 2 inch mark. This does require a bit of eye-balling. If you don't think you can sew a straight line you can draw one first with a pencil. Repeat with the other side.

 Step 9: Pin the points to the bottom of the purse and sew from the bottom of the triangle to the point directly over the existing stitches to attach the triangles to the bottom of the bag.
You are done. Turn the bag right side out and enjoy!! I think these are so cute. I like the fact that it is already lined. There are no unfinished seams on the inside of the bag. They are really quick and easy to make. No cutting involved. You have got to love that sewers!!!!


 Cheesy Grin
 Just like Dad

 At the state basketball tournament. I made this coat while I was pregnant and we didn't know if we were going to have a boy or girl. The 44 is for my husband. It was his basketball number.

 Here is the side view. You can see the paper bag glued inside the purse front and back. This would make a cute little gift bag or take home gift for a girls party. You could also adjust the shape to make different styles of purses too and there is lots you can do to embellish the front.


 This is how it will look after being trimmed.
Step #2 Cut your paper pieces. You will need 2 sets (one for the front and one for the back). I used card stock for all of my pieces.
Bottom layer: 4 x 5 1/8", Top layer: 3 3/4 x 4 7/8", Paper Stripe 5 1/8 x 3/4"

 I also used a piece of adhesive ribbon (Martha Stewart brand). If you are using ribbon you will want it to be a bit longer than the bottom layer so that it can wrap around the back side.
Step #3 Apply double sided tape to the back side of the top layer and center it on the bottom layer piece.

 Step #4 Apply glue to the back of the paper stripe and glue it in place about a 1/3 of the way up from the bottom or where ever you like it.
 Step #5 Place the ribbon in the center of the paper stripe and wrap the ends around to the back side.

 Use your first set as a guide to assemble your second set.
Step #6 Choose one set to be the front that you can add some embellishments to. You can do anything to embellish the front of these. I stayed pretty simple as I probably will just have these in my craft room for a while with no place to use them yet. I did buttons. I choose 3 different buttons and arranged them on the front.
I used my large needle to poke holes for attaching the buttons. Once the holes were poked I used my wax coated thread to tie the buttons on.

 Step #7 Apply double sided tape to the back side of the set and attach it to the bag. Repeat to attach the other side also.
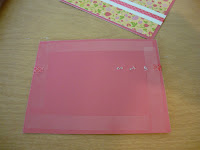
Step #8 If you want to make a bag that will be sturdy then do this step; if not skip ahead to attaching the handle. To make the side inserts cut 2 pieces of white card stock 4 x 3". Slip these into the sides of the bag.


Step # 9 Cut a piece of card stock for the handle 1 x 11". Fold under about a 1/2 " on each end.

I attached mine with eyelets, but you could use a large brad, or if you are mass producing these a staple would work great too. Center the strap in the middle of the side of the bag. If using eyelets, punch a hole in the middle of the handle side piece and attach your eyelets.


 And tada, you are finished. Here are a couple that I made. There are lots of possibilities with these. Aren't they cute and so easy. Enjoy!!!


