Nov 30, 2010

Easy Christmas Advent Idea

For all the last minuters out there looking for an easy Christmas advent idea (or maybe you didn't think you would do one because it would be too much work) I am coming to your rescue.  My friend asked me yesterday if I had any advent ideas (she needed one last minute and I wracked my brain until I came up with one).  I had to find something that would be super quick, affordable and simple to make (and you don't even have to be crafty to make it.)  The idea comes courtesy of Martha Stewart.
 To make these cute little gift pouches all you need is scrapbook paper or wrapping paper (Martha suggests wrapping paper-so you know it will be okay), some double sided tape, and ribbon.
1. Cut a rectangle from your paper.  Size is not really important-as long as it is not too long compared to wide.  You can have all different sizes or have them all the same size.
 2. Place a piece of double sided tape on one of the ends (running the width direction).
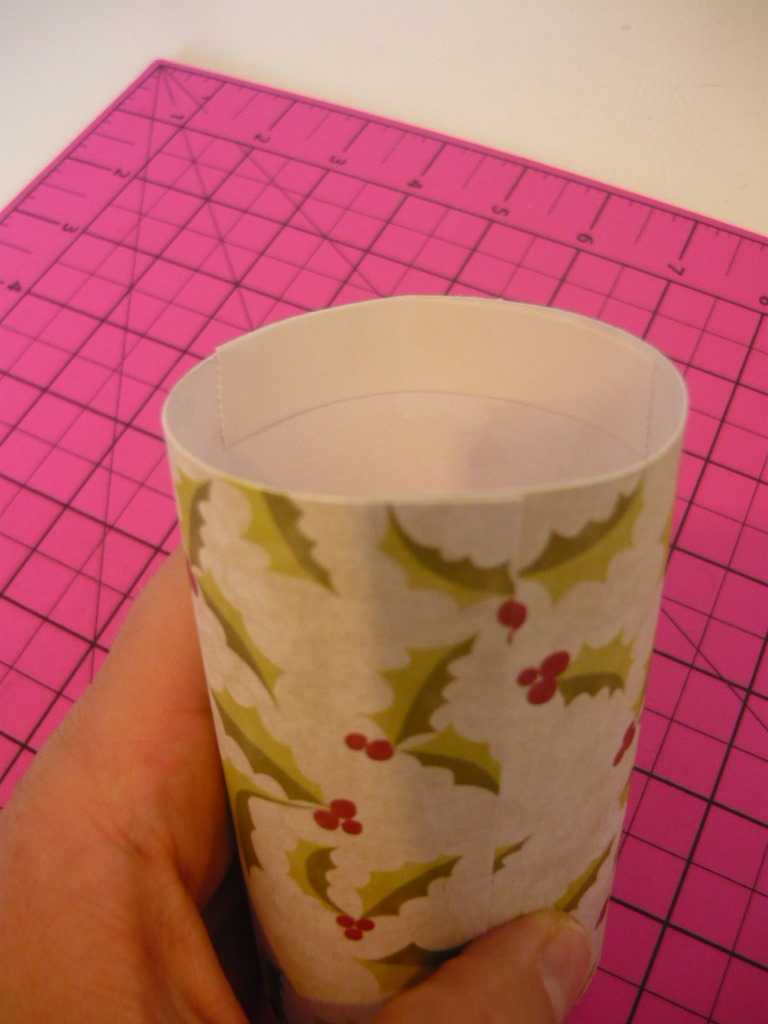
 3. Roll into a cylinder and secure the ends to each other.
 4.  Now put another piece of double sided tape inside one end of the cylinder and...
 pinch the sides together (flat).
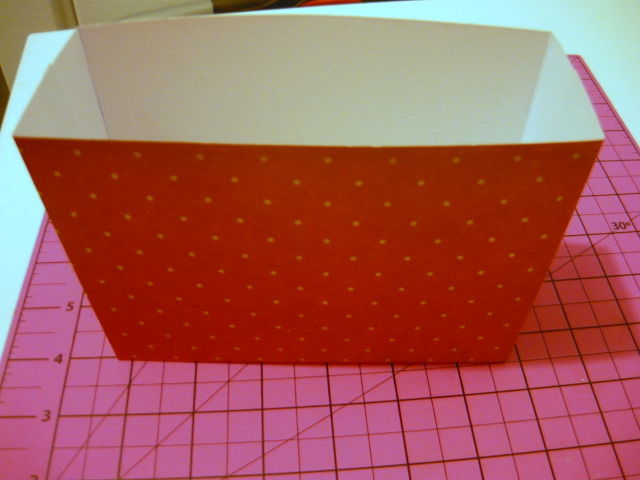
 4.  Fill with candy, small toys, or coupons to do winter or Christmas activities.  To close the other end repeat the same process only pinch it in the opposite direction of the one you just did.  In the end it should look like this:
 Another view.
 5. Lastly punch a hole in the top and thread a ribbon or string through to make a hanger.  Add a tag with the day on it, or if you are in a real hurry write the day on the pouch.
 A few that I whipped up.  Wouldn't they be beautiful in shiny wrapping paper!!!!
 I have a tree branch tree that I made that I would hang mine on.  I trimmed a branch off a dead tree and spray painted it white and glued it in a vase.  If you don't have time to do that, or don't want to do that here are a few other suggestions of places you could put these:
-on your actual Christmas tree hidden all around
-hide them in different parts of your house (one each morning) to have your children find them
-fill a basket with these and have them dig through to find the correct date
-if you live where the weather is nice, hang them outside
 Hope this helps someone.  Merry Christmas.
Pin It!
Print Friendly and PDF

Gingerbread Gift Card Holder

 Need a cute way to give gift cards this Christmas?  How about one of these "sweet" gingerbread house gift card holders.  I saw this idea in Paper Crafts years ago (yay for Paper Crafts coming through with all this inspiration this Christmas) and finally got around to making one.  I simplified their directions (I hope-so now you don't have to enlarge a pattern that you have to find from them) and added a gift card slot.  Here's how to make it.

Materials:
Brown cardstock
White cardstock
A small scrap of decorative paper for the inside of the doors
Embellishments
Ribbon

1. Start by making the base of the house.  To do this cut a piece of cardstock 3 1/2 x 5 3/4". 
 2.  Score a line along each side at 1 1/2 inches to form the doors. 
 3. Fold in doors and crease.
 4. Cut a piece off the top of each door, about a 1/4 inch down from the top and all the way to the fold (see image)
 5.  Now make the roof.  I am sure there is some mathematical equation for this; if so, I long forgot it.  This is the method I came up with.  Start with a piece of paper 3 3/4 x 4".
 6.  Fold in half with 3 3/4 being the height of the paper.
 7.  Draw a notch in towards the fold about 5/8 inch long and about a 1/4 inch deep (see image)
 8.  Cut out the notch.
 9.  Now place a ruler from the corner to the center fold.  Cut with an Exacto knife or draw a line and cut with scissors. 
 It will look like this after the cut.
 10.  Now open the roof piece and glue to the back side of the house base.  It will look like this:
 11. All that is left is to decorate.  To make the snow I cut strips of white paper with some decorative scissors that have a scalloped edge.
  I added a strip of polka dot paper to each side.  The remaining decorations are all up to you.  I added a piece of decorative paper to the inside of each door.  I put a strip of snow on the outside of the doors as well.  You could add buttons or brads.  The sky is the limit really.  There is no wrong way to decorate a gingerbread house.
 12.  Now to make the gift card pocket.  I cut a piece of paper that was 2 3/4 x 3 1/4".  I wanted a circle notch cut from the top so I traced a spool of thread as my pattern for that.
 Looks like this when cut.
 13. I decided to sew my gift card pocket in place.  It could be attached with brads or eyelets.  I wouldn't recommend glue or tape as it would be hard to get the gift card in and out.  If you decide to sew then what I always do once I have completed my sewing is thread the top strings through a needle and then through the card to the back side.  I tie them in a knot and then cut.  Don't attempt to backstitch on paper.  That doesn't work so well.
 14.  Lastly punch two holes (one on each side) in the doors.  Tie a ribbon through both and into a bow and you are done.
 How sweet!!!
 The inside.
Happy card making and gift giving.
Pin It!
Print Friendly and PDF

Nov 29, 2010

Scrapbook Paper Gift Bag

I tore this idea out of a Paper Crafts Magazine years ago and finally decided to give it a try.  I was looking for something new and I had always loved how cute these looked but thought that they would be much harder to make than they really were. Tis the season for giving so I put together a quick and easy tutorial for anyone else looking for something cute and different for holiday gift giving.
Materials:
1 piece of scrapbook paper (heavy cardstock) 8.5x11"
2 pieces of embellishment paper for front and back 3.5x4.5"
2 pieces of ribbon 17" (each)
Glue and double sided tape

1. Start by scoring all of your lines.  You will score a line lengthwise (the tall way) 1 1/4 inches in from the side edge.  Repeat on the other side.  Then you will score a line width wise 4 1/2 inches from the bottom and 4 1/2 inches from the top.  (see diagram)  You will fold on all of these lines expect where there is a dotted line in the picture (on the 4 1/2 inch lines from the edge of the paper to the 1 1/4 inch scored line).  You will cut on the dotted line with scissors.

Sorry this picture is blurry, but this is what it should look like once you have folded and cut.
2. Now to form it into a bag, you will put glue or double sided tape on the two little flaps and down one side edge.  I used double sided tape as I thought it had the best hold.  Do this on both sides first and then assemble.  To assemble tuck the flap up first and bring the two side pieces together (one will overlap the other-obviously the one with the tape underneath).  Repeat on the other side.  Should look like this:
Inside view
3.  Lastly you will decorate.  Start by adhering the embellishment pieces to both sides.  Next add the ribbon handles.  I ran a piece of double sided tape along each side of my center piece and tucked it under the bottom about a half inch.  I placed my ribbon on the underneath (bottom) first and then up the sides-pressing in place.  Repeat on the other side.  Tada-there you have it.
Perfect for all those "little gifts" you are going to be making.
Pin It!
Print Friendly and PDF

Nov 27, 2010

Snowman Family Portrait

Have you ever wondered what your family might look like as snowmen and snow women  and snow babies?  Here is a totally cute idea for the holidays-turn your family into a snow people portrait.
I got this idea from an old issue of Paper Crafts Magazine.  I drew my own snow people so that I could have different sizes and shapes to match our family (I am making a family portrait for a Christmas gift).  I added a child, toddler, baby and infant, a bunch of different styles of hats, and scarves.  You can download the pattern by going here.  The pattern is just a basic idea.  You can change the size and shape of the snow people to suit your family.  The hats and scarves and arms have to be cut smaller for the children and baby snowmen.  I can't wait to show you the finished product.  Anyone know which of my family members are depicted above?
Pin It!
Print Friendly and PDF

Nov 26, 2010

Canned Pumpkin

Before you toss your pumpkins from the fall have you ever tried canning them?  This was something new I tried this fall and it is FABULOUS!!! We got a bunch of free pumpkins from out local pumpkin patch and normally I cook them and then freeze the pumpkin but this year I thought I would try canning it.  You have to peel and seed the pumpkin.  I cut mine in half and then scooped out the seeds.  Then cut it into sections.  I peeled each section with a knife (this is a bit tough but you get the hang of it).  Then cut it into pieces.  Put all the pieces in a large pot, cover with water and boil for 2 minutes.  Then you put it in jars, cover with boiling water and process in a pressure canner (the only downfall is you have to can it for 90 minutes).  Comes out soft and ready to use in pies, breads, cookies, cakes.  Just like the stuff you get from the store.  It is recommended that you use stringless pumpkins (like sugar pumpkins).  Sugar pumpkins are the only stringless one I know of, plus Martha Stewart says they are the best for making pies so why would we ever want to use anything else?  Now I have all kinds of canned pumpkin at my finger tips and I didn't have to just toss out my fall decorations.  It's a good thing-as Martha would say.
Pin It!
Print Friendly and PDF

Nov 24, 2010

Little Gifts #4

The last of my "Little Gifts" ideas also comes form this issue of Holiday Crafts. 
 Little Gift #4-Salt Dough Ornaments.  Who would have thought that something as simple and childish as salt dough could be turned into hand crafted ornaments?  The recipe will be at the bottom of this post.  After you have rolled, cut out and baked the ornaments (and don't allow yourself to be tempted to try the dough on this project; you will be sorry if you do) then it is time to decorate.  The magazine shows to draw right on the ornament and I did that but I didn't think that the designs showed up very well.  So instead I painted mine with a coat of cream colored craft paint, let that dry and then decorated them.   Here is the best part-the designs are all drawn with a Sharpie.  Make a few extra so that you can practice.  I just used a series of swirls and dots. I didn't varnish them.  I tried both covering them with Mod Podge and clear spray paint and both made the marker run everywhere so I just left them as is.  I love how they turned out.


Salt Dough Recipe:
1/2 cup salt
1 cup flour
1/2 cup water
Mix salt, flour and water in a medium sized bowl.  Stir together until a sticky dough forms.  Remove dough from bowl and knead for 7-10 minutes on a well-floured surface until air bubbles are eliminated.  When dough feels smooth and elastic place on parchment paper and roll to 1/4 inch thickness.  Cut with cookie cutters (use skewers or straws to make holes for hangers if desired).  Place on cookie sheet and bake at 200 degrees for 4-6 hours or overnight. 

Recipe notes from Moi-I made the recipe x4 because I was planning on cutting out big shapes.  I mixed it in my Bosch mixer and it worked beautifully.  It was sticky however and when I tried to roll it it was a mess.  The part about kneading on the floured surface also adds in extra flour and that is necessary to have the right consistency.  In the end I don't know what the right consistency is-the recipe is not specific but you will not want to work with a soft dough, you will want it to be more stiff.  I rolled mine right out on my table on flour and cut on it because it helped keep it from sticking.  And yes you really need to bake them for 4-6 hours.  I did mine overnight.  We tried this as an activity for family night-I think it ended in tantrums and tears.  The next day I tried to get Small fry to decorate with me-she lasted 1 minute.  Gotta love life with a two year old.
Pin It!
Print Friendly and PDF

Nov 23, 2010

Little Gifts Part 3

The third installment in my "Little Gifts" series comes from this magazine.  A little plug for the magazine first-probably one of my favorites for the holidays.  Tons of cute ideas, patterns are included, a variety of crafts and for all crafting abilities.  This issue features ideas from bloggers and other home crafters.  Maybe it will feature me some day (one can dream).
 Little gift #3 is a personalized, stylized Christmas ornament. 
I used a Christmas ornament with a matt finish and a silver Sharpie.  The magazine says to use a paint pen but the Sharpie worked fine. 
The magazine gives a bit of a pattern to attempt to follow but pretty much this is just a series of flowing, loopy lines and dots.  I had to sacrifice one of the balls as my practice one.  I am planning on using these as neighbor gifts this year. 
Pin It!
Print Friendly and PDF

Nov 22, 2010

Little Gifts Part 2

My little gift idea # 2 is one of these adorable Little Wallets (for gift cards, credit cards and business cards).  The pattern for these is by Valori Wells and can be purchased online.  Here is a link to one website where you can purchase it.  This isn't my pattern- I used a pattern to make these but the pattern is inexpensive and they take no time at all.  I used my left over fabric from my pincushions and they turned out perfect.


Pin It!
Print Friendly and PDF
Related Posts Plugin for WordPress, Blogger...