Feb 27, 2013

Kool-Aid Dyed Coffee Filter Wreath

Who knew that coffee filters could be so crafty but I have seen all kinds of crafts popping up made from them.  And you know they are a fairly cheap crafting medium so I say the more ideas the better.  Well I have  seen some coffee filter wreath ideas lately and I was in need of a spring wreath for my door so I decided to give it a try.  I did a little research first on dying coffee filters and found lots of different ideas including coffee, tea, fabric dye, watered down paint and crystal light.  I decided to try Kool-Aid.  Like I read on one blog, "if it dyes my fingers it has got to be able to dye a coffee filter."  Well Kool-Aid definitely stains everything it comes in contact with so I figured it would work.  Only I didn't know just how well it would work and how easy it would be.
Here are my color choices (because I wanted a couple of shades of pink and yellow)
I poured the entire contents of the package in a tall container, added some water (didn't really measure-not too much-probably a cup and a 1/4).
Now take a bunch of coffee filters
and submerge them into the liquid (you only need to leave them in there for 30 seconds-it goes fast)
 then take them out, squeeze out the excess liquid (over the container) and lay them out on a cookie sheet.  If I used a really thick bunch then I separated the filters to make sure the very middle ones got colored.  If not I re-submerged them.
 Here are all the ones I did.  Don't be alarmed if the color is a lot brighter than you wanted when they are wet-it will lighten as they dry.  
 They hold the stain so well-I couldn't believe it and the whole thing too me about 10 minutes.  I did a full package of (I think close to 200) and another half package.  The only problem is that you may end up with colored fingers too but even that wore off after a day.
 Now here is the genius part.  In all the tutorials I read online people were putting these on cookie sheets all over counters to dry, or hanging them on fences and clothes lines, or lining their entire floor with them.  Listen-it is all unnecessary.  I put the whole works into my dryer, set the low heat cycle for 10 minutes and then an additional 5-7 (it depends on how many you have in there) minutes and they were completely dry (and the dryer smelled fruity fresh).
 And it was onto the wreath making.  I used a Styrofoam wreath cut in half for my wreath base.  I tried gluing directly to the Styrofoam but it and the filters do not hold the glue well so I found it was better to wrap the wreath base in cloth first and then glue to that.  I also found that this is a super messy hot glue project so put something below the whole thing to catch all the drips.  I tried gluing the coffee filters individually but that took forever and I was way over crowding them so I ripped them all off and tried gluing them in premade little bundles and that worked much better.
 To make the bundles take 3 or 4 coffee filters and lay them on top of each other.
 Fold them in half
 and then in half again.
Cut off the point.
Run a few beads of hot glue down in between a few of the layers to hold it together.
 Then add hot glue to your wreath base first (be generous) and stick the bundle down tucking it under the other filters but not too tight-loose looks better.  Go all the way around.  If you are adding a ribbon hanger do it before you cover the spot with filters.
 And there you have it-beautiful, simple, springy (and frugal too).
 I can't even tell you how much I love this project.  I have a feeling there will be more of these popping up through the year and you can bet I am going to think of a few more ways to use dyed coffee filters.  My mind just won't stop thinking of possible color combinations.  
Kool-Aid dyed Coffee Filter Wreath-my new favorite for 2013.
Pin It!
Print Friendly and PDF

Feb 26, 2013

Lessons From A Dollhouse


I have noticed from my google stats that I get the most views on craft project related posts but I have to say that since I am trying to keep it real this year on my blog if I was to only post tutorials everyday then that might lead you to believe that I actually have time to craft everyday and that simple is not true.  I am a mom first and then a crafter so I hope you will bare with some of the "other stuff" I have to say here on Small Fry.

Today I wanted to share 3 lessons I have learned over the years from my kids and their toys.

Lesson #1: 2 years ago I bought this wonderful vintage doll house set for Small Fry for Christmas.  I knew she was ready for a dollhouse but part of me also bought it because it was so stinkin cute and exactly what I would have loved as a little girl.  I got accessories, people and even a van to go with it.  I had everything perfectly set up on Christmas morning and she was ecstatic about it when she saw it but it was only a matter of minutes before I could feel my pulse increasing and my stress level rising as she proceeded to completely "trash" the whole set up as she played.  She didn't keep a single thing in it's "right" place and when she was done, everything was out of the dollhouse in a pile on the floor.  I didn't get mad but I was shocked.  How could she "wreck" the perfect dollhouse set up?  Why did she have to put the bed in the kitchen and the toilet in the living room?  Why did every single person have to be shoved in the swimming pool?  I did what every OCD mother would have done as soon as she went to be: I set it all back up.  And (because I am sometimes a slow learner) I did the same thing every day for a long time.  She would ask me to play and I would put everything in it's "proper place" before I would start.  She played with it quite a bit.  Usually everything ended up in a heap in the bins beside the house.  I would try and let it stay there until I could resist no longer and fix it all.  Eventually she just stopped playing with it.  I guess in retrospect I don't blame her with a mother always coming in and "messing" up the way she had it.  It sat unused for a while.  Finally I decided that maybe we just needed a break from the dollhouse so I packed all the accessories in a tub and folded up the house and put it in the kitchen so I could take it to the basement for a while.  I didn't get it out of the house immediately so it just sat against the wall for a couple of hours and do you know what?  This happened: the girls completely rediscovered the dollhouse.  You can't believe how much they play with it now.  It sits on top of the accessories tub until they want it down, then we unfold it and open up the box and they play play play.  And when they are done they shove everything back into the tub, slide it over and put the dollhouse back.  That is when it occurred to me that the secret to the success of this toy and any other toy is to let go of my idea of how it is supposed to be used and what it should look like and to let my kids use their imaginations to play however they feel and to be positive and complimentary at the things they come up with-I mean it would be handy to have a toilet by the oven in the kitchen in real life too.

Lesson #2: Maybe this happens at your house-you feel (as the parent) that you are living in the midst of a toy store with things scattered all over the place and yet the kids don't seem to want to use any of them.  You say, "go play with that new doll we got you" or "go play with those building blocks" or "go play with the toy kitchen" and your children seem to stare at you as if you were off your rocker.  This took me a little while to get-and consequently I have been known to buy unnecessary "new" toys to help my children have something exciting to play with-but did you know that your kids probably don't need something new at all?  When my girls stop playing with something for a while I know that it means we need to rearrange.  Yep-it is that simple.  Nothing new, no new accessories-simply moving the toys to new spots and it is like they are brand new all over again.  We have an awesome play kitchen and it has been in multiple spots in our house because when it gets boring in one spot we move it and it becomes something entirely new.  Just a month ago I simply turned the kitchen a different direction, added a little shelf for foods and the "Strawberry Cafe" was born and it has been well used and loved since.  And if you have limited space try switching things into a new box or bin, rearranging a shelf or sorting toys into new categories.  Even these little changes can reignite interest in toys.

Lesson #3: Putting things away and trading.  I am sure lots of you have read about toy rotating.  I don't do this exactly-because we actually have a base of 4 different sets of toys that the girls really like but I do swap out certain items on occasion   I will put away one item and then if the girls want it back they have to trade in something else to take it's place.  When they want the barn from the basement they might trade in a cash register or a doll in it's place.  Then they get some "new" from downstairs and play with it until it is time for it to go back.  It is an easier version of toy rotating that helps to keep toys fresh and new.

So before you give up on a toy perhaps you should try putting these 3 ideas to the test: letting go of your version of how it should be used, move it to something play new or trade part of it or all of it for something new for a while.
Pin It!
Print Friendly and PDF

Feb 25, 2013

Alternative Uses for a Turn Table

One of my favorite finds at a thrift store are these plain old plastic turn tables (you know-the ones you use to organize your spices in a cupboard).  I love to find them, and always have to buy them because there are so many different uses for these.  Today I complied a little post of "alternative turn table ideas" to share with you.
1. Your fridge.  I actually saw this one on Pinterest and thought it was genius.  How many times does a random jar of jam get shoved to the back of the fridge and forgotten?  This picture proves just how many partly used, random jars one might have in their fridge.  Coral them all on a turn table and save yourself some wasted food and money and make getting what you need from the fridge that much easier.
 2. The medicine cabinet.  This basically goes along with the fridge idea.  Sometimes you can get so many different bottles and boxes of medicine in your cabinet that you can't ever decide what to use when you look into it with a super stuffy head or are suffering from a major cold.  Organize them by type, or adults and kids medicines, boxes or bottles.  Whatever categories you like-this really helps to clean up a small space like a bathroom cabinet.
 3. Now if we are talking about disorganized spaces in need of corralling then how about a beside stand drawer?  You won't even believe how this looked before (nor am I brave enough to show you) but putting a little turn table/lazy susan in a drawer makes it much easier to keep things where you want them (by adding a little jar or container to hold- in this case chapstick, nail clippers and lotions) and prevents the all to easy habit of opening and just chucking everything in the drawer at once.
 4. I hate to burst your bubble if you think that I live in a home in which even the bathroom cupboards are beautiful, but in this house that is just not the case.  The point of this picture is to showcase my second favorite turn table uses: corralling cleaners.  It is amazing how much more organized one little space can feel when you put 5 bottles on a rotating rack rather than lined up all over the place under the sink.  This makes finding what you want super easy-no more bending in half to see just where you put that bottle of cleaner.
 5. How about keeping track of small appliances like your iron and in this case my glue gun because I use this in my craft room.  I keep the cords folded up and tucked in an empty toilet paper roll and have this up on a shelf making it easy to grab what I want and this helps to keep these things out of the way of my work area.
 6. When thinking about this post it came to me that if I could use a turn table to organize medicines or condiments then it would probably work perfectly to organize baby supplies on the change table too.  My change table usually looks like a disaster zone with diaper creams and lotions and teething medicine and cotton swabs shoved where ever I could find a place in the midst of changing diapers.  This is a perfect solution-and again you could use more than one and organize by category and also could use little containers to hold small items. 
 7. Finally my favorite use by far: organizing craft room supplies.  This one double turn table eliminated 3 boxes and 3 random containers of supplies.  Instead I used mason jars to hold clips, glass rocks, and small wooden pieces and uses small glass jars to hold brads and eyelets and finally (thanks to an awesome suggestion from my friend) I used breast milk storage bottles to organize and categorize all my colored buttons.  Now a simple turn and I can find just what I need without having to open and unstack a bunch of little boxes or riffling through a bunch of containers.  It doesn't take up a lot of room and it is super functional.

There you have it-my list of 7 alternative uses for a turn table.   Keep your eye out for these-they are much more functional than you may have thought.
Do you have any other place you have used one to help with organization in your home? 
Pin It!
Print Friendly and PDF

Feb 21, 2013

DIY Little Girl Ruffle Skirt

Ruffle skirts are so perfect for little girls. Did you know that you can make one from a few old shirts in less than an hour? I created this tutorial to make a skirt (with no pattern or special sewing skills needed) from 2 t-shirts (may need 3 depending on the size).  All you need is the t-shirts and a sewing machine.

To start you will need to cut a square/rectangle from one of the t-shirts.  Depending on the size of your child you may need to have a shape that is longer or wider.  This is forming the base of the skirt so it needs to be big enough to fit your child comfortably.  I honestly didn't measure but cut a shape that I knew would fit Small Fry.
Now, if it has writing on it leave the writing side out, and sew both side seams (this way the writing gets turned to the inside and is not visible on the finished skirt).
To make the waist band cut 1 long strip from another t-shirt.  This piece should be long enough that when folded in half it will fit around the waist of the girl you are making this for (try to cut somewhere where there is no writing).  You may need to cut 2 strips and sew them together (depending on the size you want to make).
Fold that strip in half lengthwise.
Sew the ends together to make a circle band.
Pin this to the outside of the skirt with the open edge pinned to the top of the skirt (note that the skirt piece has been turned with the writing to the inside-this is now how it will stay).
Sew along the top edge of the skirt-stretching the waist band as needed to fit the skirt piece (there should be a little bit of gathering).
To make the ruffles cut 3 to 4 inch wide strips from the remaining t-shirts (cut through both layers of the shirt leaving the side seams intact).  Sew a gathering stitch along one edge and pull to ruffle.  Pin this to the skirt just below the waist band, evening out the gathers as you go.
Sew along the ruffle piece (I use the gathering stitches as my guide for where to sew).  Then repeat with remaining ruffles.  I lift up the above layer and pin the next ruffle below (about 1 1/2" below).  Stitch over the gathering stitches as you did on the previous ruffle.

You could measure and mark a line where you want to pin the next layer.  That would help you to keep everything more even. 
Continue to add strips until you have a long enough skirt.  I sewed 5 ruffle strips and ran out of plain black t-shirt pieces so I called it good.  My under skirt piece was still longer but I trimmed that off just below the last ruffle.


And there you have it.  Simple, and super fun for any little girl.  No need to finish any seams-jersey knit doesn't fray or run-which makes it so perfect for children's clothing.
Here is my "not so little any more" girl modeling hers.  She was gracious enough to stop for a max of 2 minutes to let me take some pictures.  She keeps me on my toes with my photography skills.  If I can't get the picture I want in 2 minutes then I guess I don't need it.
I made my girls matching skirts and they loved them.  They are soft and durable.  You don't have to worry about them snagging on something, or coming unraveled.  They are perfect for kids like mine that don't care about fashion but just want comfort.  But guess what-they are fashionable too.

(this one she has a leaf stuck to her bum because she was sure I wanted a picture of her in it rolling on the ground).
Stay tuned for a rainbow version coming soon.  I am super excited about it.  Now you have yet another reason to visit your local thrift store-old t-shirts to dress the little girls in your life.


Pin It!
Print Friendly and PDF

Feb 19, 2013

"Some Bunny" Door Hanger

I'd like to take a minute and introduce you to my brain.  It never shuts off and so when I am doing something completely normal like throwing away an empty cracker box, just as I am about to toss it into the trash I look at it once more:
and see this:
And the box is rescued and stashed away in my craft room with all the other containers that have given me a crafting vision.  It is fantastic and exhausting because I have the hardest time throwing things away-seeing what they could become.  I have way more supplies and ideas than I will ever have time to turn into creations but since I continue to pray for ideas to come I can't just brush them off and toss them.  Someday every one of the boxes will become something awesome.  You all are lucky enough to get to see this cracker boxes fate: and adorable Easter Bunny Door Hanger

 This particular project uses the 15oz size box of Great Value multigrain crackers (which p.s. are very good).  I have scaled the milk carton pattern to fit it exactly so if you choose a different size box then you might want to check the milk carton size just to make sure it fits.

Supplies for this project:
1 cracker box
scrapbook paper
spray glue
white cardstock and milk carton template (see bottom for link)
adhesive backed fun foam (white and pink)
pink chalk
black marker

1. To begin measure up from the bottom of the box 2 inches and mark all the way across the box (it is hard to see on this picture but I do have a line across the width of the box).
2. Now turn the box to it's side and mark a 2 inch mark and then a 3 inch mark and draw a line attaching the 2 dots.
3. Cut along all the marked lines, and then cut off the remaining box front leaving you with a nifty little holder.  Mark and cut out an oval shape to make it hangable (is that a word...it is now).  (NOTE: this fits over some door knobs very easily and some not so easily so keep that in mind-you may want to adjust the shape of the hanger hole-but keep it an oval-it allows the hanger to slide to one side slightly to fit on a door knob better).  After you have this done you can cut cardstock or scrapbook paper to fit over all parts of the holder.  
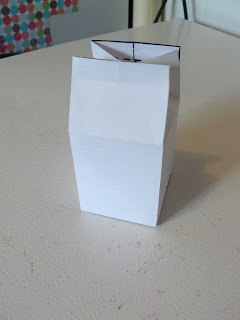
4. Now print (onto the white cardstock) and cut out the milk carton template x2.  Fold according to marked lines (if you notice at the top it is missing 2 angled lines but they should be there and you need to fold where they should be).  If you haven't made one of these before you might just want to make a practice one.
I hold mine together with double sided tape.
5. Using the template provided, or create your own and trace the bunny ears onto the white fun foam.
6. Cut out the ears and cut off a 1/2 inch of the backing paper on the bottom of the ear.  You want to be able to stick these to the milk carton but don't need the entire adhesive back exposed.
7. Use your pink chalk and chalk the ear middles and then embellish with tick marks around both ears (made with a black ink pen)
8. Before you staple the milk carton closed you will of course want to fill it with treats to share with your neighbors or whom ever you are giving this to.
9. Lastly add the nose (cut from pink fun foam) and draw a little face.  I also chalked my bunnies cheeks.
10. Now slip these little bunnies into their comfy box.
11. Print and add your tag and you are set to spread a little spring cheer with neighbors and friends.

Who wouldn't be thrilled to come home to find these cute little friends hanging on your door.
Making an oval opening allows you to be able to have the hanger slide more to one side to accommodate a tight door.
"Hoppy" Easter everyone.  Now go and share these with some "bunny" you love.


Also shared here:

Tuesday To Do Party
Get Your Crap Together
Pin It!
Print Friendly and PDF
Related Posts Plugin for WordPress, Blogger...