
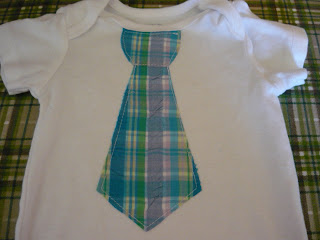
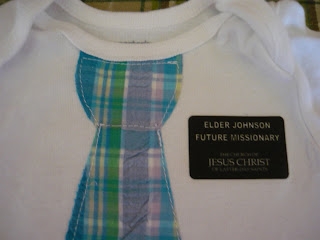
 I have seen these around for a while now and have seen them on a few blogs and I have always thought they are totally adorable. I have been wanting to make some for a while but it was just another thing on my list. Well I finally got some onesies and found a perfect pattern for the tie on the blog Crap I've Made (click the link to go straight to the tutorial and pdf pattern). They were so easy to make and turned out so cute. I decided to embellish a bit by adding a missionary name tag. I am including a tutorial for the tag part. Just a bit of preamble about the tutorial. I am sure for all you totally computer savvy folks you could find a much more efficient or better way to do this. I however, am not computer savvy so I just do what works for me and is easy. That said I hope I can explain this well enough.
First go here to get an image of a missionary name tag. You will have to click on the one you want and it will bring the picture up in it's own screen. I right clicked on that picture and copied it and pasted it into Microsoft Word.
Second once in Microsoft word resize the image. Mine ended up being about 1& 3/4 inches long and about an inch wide. After you have resized the image you will want to flip it horizontally. Incase you have never done this and you don't want to go through all the hastle that I once did to figure this out, you click on "draw" at the bottom of the screen, then "rotate or flip" then "rotate horizontally". This only works on images and word art (at least for me, like I said, not too computer savvy).
Third open up the word art program to create the personalized name. If you aren't making these for someone specific you could just put "future missionary." I think adding the name is a great touch. I used the most basic word art font. When it opens up type the name you want and then hit "enter" and type "future missionary." (has to be done in 2 lines) I changed the font size to 10. This will place the words on your screen now. You will need to change the text wrapping to "behind text" and this will allow you to move the words onto the name tag.
Fourth flip the text horizontally following the same steps you did for the tag. Just make sure you click on the text before you start.
Okay, clear as mud right. You are all smart enough to figure it all out yourselves I am sure anyway.
Lastly you will need to print the tag out on iron on transfer paper. I just bought a package at Wal-mart. Seems like every time I want to use it, I print my image and words without flipping them horizontally and then remember after the fact. That is why I have given you the tutorial so that you can avoid the same mistake. Whatever way you make the tag, just remember to flip horizontally before printing or it will not be right. After you have printed it out, cut around the image, I always leave a little edge of white and round my corners.
 Position the tag where you want it and then press hard with a hot iron. You just need to apply pressure over the whole thing, don't move the iron around alot (it tells you on the package of paper)
 Once it has cooled, carefully peel the paper backing off and tada a cute little missionary name tag.


I'm not Mormon, but that's very cute & funny! :)
ReplyDeleteLove the Missionary badge! I'm excited to try this out! I'm linking to it!
ReplyDeleteOK, my SIL just had a little boy and I made her one of these tie onsie's.....I wish I would have seen this though!
ReplyDeleteShe woudl LOVE it! I may just have to make another one just because! So cute :)
Thanks
That is HILARIOUS! Great idea! I'm pretty sure I couldn't figure out how to do it, though. ROFL!
ReplyDeletethat's so awesome
ReplyDelete