Oct 25, 2010

Mummy Bag Tutorial

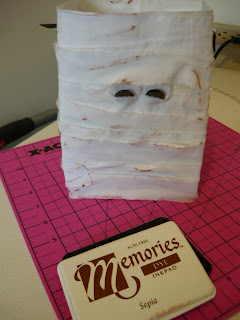
As promised (and I am early) here is a tutorial for these cute Halloween Mummy Treat Bags. They are pretty easy but in case you need a little help I have pictures.
First you will need:
-a white paper lunch bag
-1 inch strips of white fabric
-1 piece of white cardstock
-glue
-hot glue
-googly eyes

1. Start by cutting 3 and 3/4 inches off the top of your bag. You could make your bag the full size but that takes more fabric and time and I like the proportions of this size better.

2. Next cut 2 pieces of cardstock 3 3/8 x 7 inches.
3. Open up the bag and glue the cardstock to each side to make it stay open and give it more stability.
4. Now take your fabric strips (the longer they are to start with the quicker the project will go) and
begin wrapping them around the bag (one at a time) securing with hot glue. Don't be too neat while doing this-mummy's are not wrapped perfectly. Continue all the way around the bag to the bottom.
5. Next fasten the eyes, tucking them in under one of the layers of fabric. Then take another fabric strip and wrap it around slightly over the top of the eyes.
6. To add the handle I put some eyelets in the sides of my bag first. This is not necessary because a handle could just be hot glued right to the bag. This does make it a bit more sturdy.
Then I threaded a piece of ribbon through each side and tied the end with a knot on the outside of the bag.
7. Finally I wanted to make my mummy look a little bit aged so I used my Sepia ink pad and brushed over the bag here and there lightly.
8. Then to add a bit more cuteness I added a couple of extra halloweenish ribbons to the handle and that is it. One cute little mummy!!
Pin It!
Print Friendly and PDF

Oct 24, 2010

Mummy Bag

There was such a great response to my mummy trick or treat can that I had to come up with one more mummy thing before Halloween. Mummy Treat Bags-made from a white sandwich bag. I will have a tutorial by Tuesday I promise (sorry it is last minute-but heck why not live on the edge). If you want to make some I found white sandwich bags at Wal-mart and you will need white fabric scraps and googly eyes. There now you can get your supplies together and wait by the computer for my tutorial so you can get crafting (ya right-in my blogging dream world).

Pin It!
Print Friendly and PDF

Halloween Preview

A quick preview of the girls Halloween costumes. We are doing a family theme this year. The costumes are unfinished and made without patterns so they are definitely not comparable to the store bought version but my girls have the ability to make anything look cute (hopefully daddy and I can do our costumes justice as well). So here is what we have so far:

Small Fry is going as Cinderella (I love the attitude in this picture-it was a miracle I even got her to try the costume on)
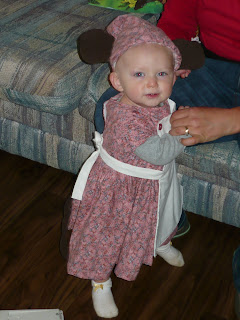
Can you guess what my little pumpkin is going to be? It is in keeping with the Cinderella theme. This was just a trial run of her costume to make sure it fit.
She is going as one of the girl helper mice. You can't really see the tail on her costume in this picture. Stay tuned for the full family in costume (but don't expect anything before Halloween I have yet to begin on mine or my husbands).
Pin It!
Print Friendly and PDF

Oct 19, 2010

A first in a long time

Yesterday my husband and I went for a 4-wheeler ride alone-just the two of us. Do you know how long it has been since we have done something without our kids? 9 months to be exact. Our little pumpkin has had such terrible stranger anxiety that we could not leave her alone with anyone for even a moment. It has been so hard. I never in a million years thought I would have to worry about the fact that I would want someone to hold my child and not be able to have them because she would be so hysterical. It is so confining in a way. I love my children but every parent knows that one key to healthy and successful parenting is being able to have moments away from your children. Well this was a miraculous and prayed for moment and it was wonderful. Grandma and Grandpa watched the girls in a trial run as my husband and I are planning to go on a date on Friday together for the first time in a very long long time. I worried the entire time that pumpkin was screeching but tried to enjoy our half hour alone. Blessed-that was the word for our afternoon yesterday-blessed.
Pin It!
Print Friendly and PDF

Oct 15, 2010

Winners Winners Winners

We have 3 winners. Oh I wish you all could have won. I wish my mom and brother could have won. But I used a random number generator and the winners are:
Angie Kerr
Maureen &
Misty
I am e-mailing each of you because I need your addresses to send to Elmer's so they can send you your prize packs. Wahoo. Congrats to all three of you and thanks to everyone for the wonderful comments and all the enteries.
Pin It!
Print Friendly and PDF

Oct 14, 2010

Things you probably already know

Just wanted to share a few things (random and in no particular order) that I have discovered and love-which you all probably already know about. But in case I am not the last person on earth to have found them or tried them I will share them in hopes to make other lives a little better (and in some cases yummier).
#1. Executive Homemaker. Have you checked out this blog? I hadn't until I was searching the Internet for some printable cupcake toppers and was lead to it. Fabulous stuff to make a mom and wife's and ladies life a whole lot cuter, funner, easier and more organized. And the best part is you can sign up to have stuff sent to your e-mail. So every couple of days you get a cute free printable sent to your inbox (and it sure beats junk mail). Really cute stuff. Go here to check it out.
#2 The best and quickest way to make doughnuts. Oh my goodness all these years people I have been wasting my time I tell you, making cake doughnuts from scratch (not like I have done it a ton but enough to have considered it a waste of my time) after finding out that you can use those package refrigerator biscuits instead. Now under normal circumstances I think they are terrible as an actual biscuit but deep fry those suckers and cover them in a glaze and they are heavenly. I even used the cheapo Western Family kind and they were divine. I wanted mini doughnuts so I broke each biscuit in half, then rolled the half in a ball, flattened it with my hand, and poked a hole in the middle. Deep fry in a bit of oil. They were the perfect size. I made a simple glaze of powdered sugar, milk and vanilla for half of them and dipped the other half in sugar. WOW-seriously could have eaten the whole plate myself. I am not promoting these as a health food by any means. Those biscuits are loaded with who knows what but if you want to make some good doughnuts quick and cheap-this is the way to go.
#3 Easy applesauce-courtesy of Martha Stewart. I found this recipe in a Martha Stewart Baby Magazine (remember when they had those and the Kids editions too-oh such great magazines that you can no longer get). She was showing how to make applesauce as a baby food. I thought, "why not do the same thing on a larger scale to use for canning?" So here is what you do. Sorry because there are no measurements really.
First start by washing, coring and cutting up your apples into about 1 inch pieces. You don't need to peel them. I REPEAT-DO NOT PEEL. (I would say I use about 25 medium size apples per sauce pan full but I just cut until my pot is full). Put those into a large pot and add water-enough to steam them (I do about a cup and half-maybe two cups-not too little not too much). Put a lid on your pot and steam over medium heat until the apples are soft. They will look like this-only this is taken after I have removed about half of my apples.
Put your apples into a blender with part of the water. You will want to have at least 1/3 of your blender filled with water otherwise your applesauce will be too thick. Blend. You may need to add more water if it is too thick. You can have thicker or thinner applesauce too depending on what your preference is. Better to start with less and have to add more.
Then press through a strainer. If you have one a little larger and in better shape than mine you would be in business but even this small one does the trick. I pour in part of the applesauce and press it around with a rubber scraper. The applesauce will go through and the skins will...
stay on top like this and you can scoop them out and throw them away. You may get the odd skin in your sauce but you will end up with a very smooth and creamy applesauce.
Like this. You could do this on a large scale to can or on a small scale to eat fresh for your family or as baby food. Easy and delicious.
#4 Crock pot Chile Verde. I am posting this on for my friend Tali because I was talking to her on the phone while preparing this and she said it sounded fantastic and oh it was delicious. Whenever I have my choice of restaurant it is Mexican and one of my favorites is Chile Verde. Well here is a super easy crock pot version I just discovered.
You will need:
1-2 pounds boneless pork chops
1/2 cup baby carrots cut up (or you could have more or omit this entirely)
1 jar Salsa Verde
Put the pork chops in your crock pot. Add the carrots and cover with the jar of salsa verde. Cook on low for 8 hours of high for 4 (though my crock pot never takes that long). You can serve the pork chops whole or do what we did and shred them and then serve them on tortillas with beans and all the trimmings. So easy and so tasty. But you probably already knew all of this.
Pin It!
Print Friendly and PDF

Oct 12, 2010

One more Halloween Decoration

I had an itch to make one more Halloween decoration for the season (not including the things I have yet to make for pumpkins birthday party and the actual costumes to be made.) Super easy and cheap (two qualities of a perfect craft.) Start with one of these cheapo wreaths. I got this one at the dollar store just the other day-ya I know it is only October and they had a ton of Christmas stuff out. CRAZY!!
Take it outside and spray paint it black. In this picture it looks white but that is just the lighting because I was actually using black paint.
Here is a tip I learned the hard way. I started by fanning my wreath out how I would want it when it was finished and then started spray painting but I kept have to go back and paint some more and more because I would find a place that was tucked under some where. So instead start by standing all the pieces up straight and then spray paint front and back and from the sides and you will waste less time and paint. Also if you want it to be more shiney use a glossy finish spray paint. I used elcheapo flat spray paint so I added a few sprays of glitter while the paint was wet.
Last tear 1 inch strips of fabric in Halloween colors (length doesn't matter because you will be able to cut them) and tie around the wreath. I kept a pattern but that isn't even important either. You could add spiders or bugs or anything else you would like to jazz it up. I left mine just like that and I think it looks pretty festive.
Upclose.
Pin It!
Print Friendly and PDF

Giveaway reminder

Just a reminder that the Elmer's Gift Pack giveaway ends Thursday at midnight so get your comments posted. I did ask that you post a comment and your e-mail but there are lots of comments without e-mails attached so I am assuming you all want to be entered and I am being forgiving and including everyone. E-mails just make it super easy to contact the winner(s). And to my friends and family who have not yet entered-GET CRACKING!!!!
Pin It!
Print Friendly and PDF

Oct 7, 2010

Halloween Candy Can for the Elmers Craft Challenge and a GIVEAWAY

GIVEAWAY CLOSED
For the Elmer's Craft Challenge I was supposed to create a craft using some of the awesome crafting products that they sent me in the mail. This is what I came up with. It is a candy can made from a #10 (one of the honkin big food storage sized) tin cans. I wasn't required to post a tutorial with it but I thought that it would be fun to add.
To start I spray painted the outside of my can focusing on the top edge outside and inside and the bottom edge and bottom of the can. The middle is going to be covered so there is no point wasting spray paint on it. Then I put a plastic bag inside my can to keep whatever I put in it clean. If you are using a clean can this is not a necessary step but if you are recycling one like I did from outside I would recommend this.
I used one of these bags that I had tucked away.
Next you will cut a piece of fabric the same width as the height of the can and long enough to wrap all the way around it. Spread a coat of Mod Podge on the can and smooth the fabric all around the can pressing out the wrinkles.
Brush a thin layer of Mod Podge over the top and let it dry.
Next you will want to create holes in the sides for your handle. Now if you are handy with power tools or have a husband near by who is handy with power tools then you will find a way to make these holes. If you are left alone during the kids nap time with no power tool skills and no husband in sight (like myself) then you can try this method (which requires a little muscle). I used a screw and a screwdriver and firmly (and I mean firmly) pressed my screw in place and then screwed with the screwdriver until it began to pierce the can then screw it half way through. I am not saying this is the easiest way I am just saying it is a way when you have no other ways. After making three of these I did think, "duh-I could have just hot glued the ribbon handle to the inside of the can and called it good," so there is an option as well.
After removing your screw you will want to flatten the inside edge of the hole using a pair of pliers. To make the handle cut a length of ribbon as long as desired and angle the ends. Poke the point of one end through the hole and pull through. You could also use wire, or rope to make the handle.
Knot the ribbon and clip the end so that it is neat. Repeat on the other side.
Handle will look like this.
To finish both the top and bottom edges I hot glued another length of ribbon all around.
Now to make the decorations. How you decorate it really doesn't matter. I wanted to try out my new circle cutter for this one so I cut out 3 circles slightly bigger than the other of different colors of paper.
I layered them like this. The lighting is bad but the colors are orange, purple and yellow.
To hold them together I used these handy little things-glue spots.
I wasn't sure if there is a technique to applying these or not but this is how I figured out they work the best. You hold the paper that they come on with the glue spot facing down on whatever you want to apply it on, stick and pull up. The glue spot stays and doesn't bunch up. They are strong and very sticky. I also applied these to the back of the last circle that then stuck to the fabric on the can. You will want to hold whatever you are sticking on in place for a bit or put it up against something just to help it take the shape of the can.

For the word, "candy" I used chipboard letters that I spray painted black and then stuck onto my paper circle. My letters had an adhesive back already.

Lastly I added some paper bats and buttons and ribbons to embelish and TADA-a Halloween Candy can.
Here is the set of 3 that I made. I can't wait to have them filled with candy, caramel corn and snacks for Pumpkins Teeny Halloweeny Birthday Party.
Lots of possibilities with these. You could make them with smaller cans, or for different holidays. Thanks to Elmer's Glue for all the fun stuff to use while making these.
Now here is the best part. Elmer's is giving me THREE prize packs to giveaway to my readers. The prize packs include:

X-ACTO:
4-pack Decorative Edge Scissors
Self Healing Mat
Retractable Craft Knife
Craft Swivel Knife

CraftBond:
Scrapbooking Tape: Repositionable
Extra Strength Glue Stick
Wet & Dry Dual Tip Glue Pen
Permanent Tape Runner
They can be sent to anyone in Canada or the USA. And because I hate those giveaways where you have to do 20 million things to enter and get more entrees. I am keeping it simple-if you would like a chance to win then leave a comment with your e-mail address. One entry per person. The giveaway will stay open until OCT 14th. Good luck everyone. (my family and friends-don't forget to enter)
Pin It!
Print Friendly and PDF

Oct 3, 2010

All is right in the world

Just yesterday I was in the kitchen washing dishes while my girls were on the other side of the room playing together-perfectly content. Let me repeat that-they were playing together while I was washing the dishes. Something so simple and probably for so many moms a totally normal activity but for me it was a miracle. I have rarely had any time to myself to just do my mom duties without children under my feet or attached to my leg or begging for something in probably 10 months. There was no TV on, the girls just played. Once the dishes were done I moved on and peeled apples for a pie. I think I did my own thing without interruption or having to say a word to my girls for 15 minutes. I almost wanted to cry. The other morning I had prayed that since it seemed like I could never get anything done without some sort of circus going on under my feet that instead of wanting it to go away or getting frustrated and mad I would just be able to learn to love cooking spread eagle style-carefully stepping over children, blankets, pots, pans etc (the menagerie). But on this particular day I guess I was just extra blessed and all was right and heavenly in my home for 15 minutes. Progress.
Pin It!
Print Friendly and PDF

Oct 2, 2010

White Sweater Pumpkins Tutorial

I first saw the idea for these on Craftaholics Anonymous. I have already confessed my pumpkin addiction but can I just say how giddy white pumpkins make me. Aren't they just glorious. These sweater pumpkins are the next best thing. Don't you just love the textures? (Wouldn't these fabulous with an orange sweater!! I mean an orange sweater would be totally tacky to wear but cut up into one of these-PERFECTION.)
Here is a tutorial for both a sewn version and a no-sew (well okay there are a couple of stitches but you can do it I promise) version.
Sewn Version
1. Start by laying out your sweater and deciding where to cut. I use the sides of the sweater as my side seams so all you have to decide is the height. Experiment with different sizes because each one will make a different shaped pumpkin. The higher up on the sweater you cut the taller your pumpkin. Well just play around with it-you really can't go wrong. I chose to cut right below the arm pits. No need for measuring or straight lines. It should look like this. This is cut through both the front and the back of the sweater.
2. Next using embroidery floss (all 6 strands-because the sweater material is thick and heavy and you want something durable to sew it with) and
a big honkin fat needle, thread a long piece of floss with a knot tied in one end.
3. Turn your sweater piece wrong side out and starting with the knot on the wrong side sew a running stitch all around the bottom edge of the sweater.
4. Pull on your thread to gather the bottom edge as tight as possible but don't break your threads.
5. Now using the same needle and thread stitch back and forth to sew the opening closed.
6. Turn this piece right side out and stuff. It looks big and huge and awkward at this point but don't fear.
7. Now sew another running stitch around the top edge, pull the thread to gather it tight and sew back and forth just like you did on the bottom.
8. Working with a new (LONG) thread, knotted at one end, start from the underneath side of the pumpkin and poke the needle up through the bottom being sure to hold onto the end while you squish the pumpkin and pull it out through the top.
Like this.
Take a stitch across the top gather and back down through to the bottom pulling tightly to create an indent in the top.
Like this. Repeat this about 4 or 5 times, taking your top stitch across at different places to help tuck in that top seam.
9. For the stem I cut a dead tree branch from the neighbors dead tree in the back alley. Cut it in pieces. Hot glue this to the center of the pumpkin.
10. For leaves I crudely cut out a leaf like shape with a piece of quilt batting sandwiched in between. You could make a leaf pattern using a picture from the Internet as well. I stitched them on my sewing machine to hold them together. If this step seems daunting then I would go to the craft store and find some fake fall foliage and buy up something that looks like a pumpkin leaf.
Glue these in place. They help hide parts of the seam that may be sticking up.
And there you have it.
No Sew Version
1. For the no sew version I cut a piece from a sweater but only from one side. I wanted to make a smaller pumpkin so I am only using a piece of the sweater rather than from seam to seam because that was bigger than I wanted. The size once again does not matter so feel free to play around with shapes.
2. With the right side up run a bead of hot glue down the length of one side and half the bottom. Fold the square piece over to form a rectangle like this. Press to make sure the glue holds.
3. Now turn it right side out. (this is showing you the bottom)
4. Stick one hand in the piece and run a bead of glue along the bottom with the other.
Now fold in half matching the bottom points and hold until glue sets. This forms the bottom of your pumpkin.
5. Stuff as full as you would like and then run another bead of hot glue along the inside of the top opening and press to close.
6. Run a bead of glue along the outside of the the top now and fold it in half also (like you did with the bottom)
7. Now for the tiny bit of sewing. As with the other pumpkin, you will want to use a long piece of embroidery floss and a honkin big needle. Thread the needle and knot the end of your thread. Start at the bottom and stick your needle in and squish your pumpkin allowing your to pull your needle out the top. Because you glued this together you will want to be careful where you stick your needle.
8. Take a stitch across the top and then back down through the pumpkin and out the bottom pulling tight.
That will form an indent like so.
9. Attach your stem and leaves and a raffia bow if you would like and you are done.
Mix and match with some orange ones and you are set for fall (and these will last as long as you want) I would love to keep mine up all year (if they survive Small Fry using them to bonk her sisters head).
Enjoy!!
Pin It!
Print Friendly and PDF
Related Posts Plugin for WordPress, Blogger...