Dec 31, 2010

Happy New Year from Small Fry and Pumpkin

Happy New Year!
Pin It!
Print Friendly and PDF

Super Easy Fudge

Now I know for sure that you all know this already-I am just slow at catching on.  I wanted to make some fudge for Christmas but I also wanted to not spend a lot on the ingredients.  I found this recipe in my Dessert Recipes Binder and thought, "it can't possibly be this easy," but I gave it a try anyway.  Sweetened condensed milk and a package of chocolate chips-no way that is making fudge.  HELLO-not only does it make fudge but it makes DELICIOUS fudge.  Duh-my can of sweetened condensed milk shows pieces of fudge on it-why have I never caught on to this.  All these years I have been slaving over Martha's recipe which is delicious but has lots of room for error.  Well anyway I know that the season of fudge is over but who needs a holiday to have a pan of this to enjoy. Here is the recipe I made but you can tweak it pretty much however you want.

Cookie Fudge
1 package semi sweet chocolate chips
1 can sweetened condensed milk
2 tsp vanilla
10 oreo cookies chopped

Microwave chocolate and condensed milk together in a bowl for 2-3 mins or until chocolate is almost melted (stirring after each minute).  Add vanilla and mix well.  Stir in chopped cookies.  Line an 8 inch pan with parchment paper with the ends extending over the sides.  Spread chocolate mixture in pan.  Refrigerate 2 hours.  Remove parchment paper from pan and cut into squares. 
Pin It!
Print Friendly and PDF

Dec 30, 2010

Merry Christmas to Me

Look what came for me in the mail-my Christmas present to myself along with fabric (man-the cost of fabric can add up quickly huh.  I could have bought tons more had my money not ran out.)  Can't wait to start sewing.  Happy Christmas to me!!
Pin It!
Print Friendly and PDF

A blessing or a Curse

I bought this for the girls for Christmas.  It was on clearance for $20.00 at K-mart and I thought it would be great to play on during the cold days of winter and then it can go outside in the summer.

 It is either going to cause me to have a nervous breakdown or save us this winter.  As I step over the 100+ balls thrown all over the floor on a daily basis I can't decide which it will be.
For now the girls are LOVING it so that is all that matters.
Pin It!
Print Friendly and PDF

Dec 29, 2010

The New and Improved Small Fry and Co.

If I was a technical genius all of this would have been done over night but that is so not the case.  I was hoping to have someone else revamp my blog saving me a lot of time and frustration but when I started looking into how much that costs I quickly realized that I didn't have the money to pay for a blog makeover on a blog that is currently making me no money.  Instead I decided that I would have to just figure it out myself.  Thankfully there are lots of tutorials for "do-it-yourselfers" like me.  Here are a couple of the highlights:
#1-A cleaner, neater Small Fry & Co
#2-Pages.  These are stand alone pages to which I can continue to add links.  There is no place to comment on pages but if you have a comment or question shoot me an e-mail or leave it after a post.  Check out my tutorials page for an "all-in-one" look at my favorite tutorial posts.  Check out my recipes page for links to all of my favorite recipes I have posted about or linked to.
 #3-I HAVE A BUTTON (yippee, hooray, fantastic).  You can find it on my sidebar under "subscribe to" or grab it right here.  You can post it on your blog now if you wish and help spread the word about Small Fry.

Just in case you are thinking about trying some "do it yourself" blog remodling here are some of my favorite sites to help you out:

As always, thanks for reading Small Fry.  I am hoping to have a great new year of blogging with all things to keep getting bigger and better around here.

Pin It!
Print Friendly and PDF

Dec 28, 2010

Medical Insurance and a Real Mommy Moment

This has nothing to do with crafts, or recipes or venting about Walmart-just a Real Mommy Moment from my life.
Three days before Christmas I received a medical bill from the Doctors office for $488.00.  That's right $488.00 after taking my little pumpkin in for her 1 year well baby visit.  Before this I don't think I ever paid a cent for a well baby visit except the office co-pay.  The word shocked does not describe how I felt; dumbfounded is maybe a better word to use.  My heart instantly sank realizing that $488.00 was not something that we could come up with.  I looked over the bill-my insurance had covered the visit to the office, one immunization and the basic "look in her ears, eyes, nose and measure her" stuff.  The other immunizations that she received were not covered, nor was the administration of said immunizations.  WHAT IN THE WORLD!!!! I called the insurance company.  I had already done that you see-before I even took her in for the appointment.  I called to ask if the well baby visit was covered.  I was told it was-I was wondering if the new health care law would cover the visit but the lady told me that the health care law didn't matter in my case because I had insurance and this insurance covered all of the visit.  So when I called this time wondering what on earth was going on I was told that my insurance does cover all of the well baby visit but not all of the immunizations.  So let me get this straight- as part of the well baby visit I am to get my baby immunized (well I choose to) and I am told by the nurse what immunizations my baby is to receive.  Doesn't that sound like part of a well baby visit??? Part of  a well baby visit that is "100 % covered by my insurance?"  So I said, "my health care rep. said that our insurance is to cover all of a well baby visit and that 100% of immunizations are covered up to age 19."  She said, "yes we do cover all immunizations up to age 19 but we don't cover all of them."  HUH???? Does that make sense to any one else?  So pretty much the lady I talked to the first time should have informed me that yes my insurance does cover all of a well baby visit and 100% of immunizations but it will not cover all immunizations.  But she did not-hence my $488.00 lesson in how to make sure you ask every question possible in case the lovely person you are talking to fails to truly inform you about your health insurance.  I called my doctors office and asked about the bill.  I was told there that actually what happened in the office was that the nurse who does the shots checks to see what insurance the patient has and then makes sure that she does not give a $200.00 shot to someone who is not covered.  In my case she did look to see what insurance I had but their computer still showed my former insurance (one that covered these kinds of things) and so she proceeded to administer the shots when had she known they weren't covered she wouldn't have and would have sent me to the health department where I could have got them for like $15.00.  So the office claimed a great deal of the responsibility.  I said, in sobbing tears, that had I known the shots were not covered I would have never had them done there and I explained that I was under the impression that my insurance did cover everything.  The billing department lady was extremely sympathetic as I said, "now I have a $500.00 Doctors bill and no way to pay for it."  In the end, the Doctor-bless him, said that the clinic would eat the costs and that I was only responsible for administration of the immunizations-$186.00 as opposed to $500.00.  It is still more than I would ever choose to pay for a routine visit to the Doctor but it is a blessing to my little family.  So here's the thing-as a parent you always tell yourself that you would do anything for your kid-you want them to be healthy and strong and there is no limit to what you would pay to make sure they always stay that way.  And then you hit a financial road block and you are counting every penny and suddenly you find yourself thinking, "should I take her to the Doctor and pay the $35.00 co-pay just to see the doctor let alone what ever else she might need, or can we wait it out and see if she gets better on her own?" I hate it-I hate having to question whether or not I should get my children the medical help that they need, but we simply cannot afford to take them to the doctor every time they are sick.  How do I know though if she is going to get better on her own-I don't-I just pray she will.  And then there are the times when you feel guilty with this miserable little girl coughing and hacking and decide you had better take her in and what are you told-"there is nothing we can do-you will just have to wait for her to get over it-oh and by the way don't forget to pay your $35.00 for my totally useless advice."  I don't know-just saying that I hate it.  I wish we had endless money so that I never had to worry and I could afford the best Doctors whenever I desired.  I wish I had some magical power that made me able to tell exactly what is wrong with my kids every time.  I wish I had some way to make a $488.00 bill disappear.  It's one expensive life lesson.
Pin It!
Print Friendly and PDF

Dec 24, 2010

Super Cute Christmas Printables from Babalisme

Need something to do Christmas eve with the kidos?  How cute are these!!!!! These are printables from Babalisme.  She has the cutest illustrations.  Lots of free stuff on her website.  I am sure you all already know about her. Print these on a sheet of magnet-wouldn't that be so cute.  I was totally ready to do just that and remembered we are out of colored ink.  BLAST!!  Hope someone can enjoy them.  I will have to make mine for next year.  That is fine-my little pumpkin would eat them right now anyway.

NOTE: These are not necessarily free.  She may have added a charge to them since posting.  Check it out and see.
Pin It!
Print Friendly and PDF

Dec 23, 2010

What do you make for 18 basketball players that would not break the bank?  18 luggage tags with personalized basketball numbers on them for their gear bags of course.  Here is what we are giving all of my husband's basketball girls for Christmas.


These are really easy to make and really cute.  Making 18 of them is time consuming but I know they will love them.  I got the pattern from Skip to My Lou.  If you need a last minute idea-go there.  She has tons of great ideas.
Pin It!
Print Friendly and PDF

Dec 22, 2010

Snowman Family Portrait

It's done!!! I finished last week.  I LOVE how it turned out.  Finding a frame to fit everyone was not an easy task but in the end it turned out just how I wanted it to.


If you want to make your own you can download my pattern for the snowman family to help you get started.
Pin It!
Print Friendly and PDF

Dec 21, 2010

Have you missed this little face?

I realized that I haven't posted any Small Fry pics lately so I thought I better get cracking.  I have been posting over at my family blog so she hasn't been neglected don't worry.  In fact she's been very busy...getting into things. 

Does this cause anyone else to have horrific flash backs to that dumb Drew Carey show?
Pin It!
Print Friendly and PDF

Dec 18, 2010

Cookie Exchange

Do you have a favorite cookie or other goody recipe that you want to share?  Link up and join the Virtual Cookie Exchange.  Everyone welcome.  If you don't have a blog-send me your recipe and a picture and I will add it to this post. (If you want one of the recipes you can click on the recipe card picture and print it).  Recipe cards are thanks to Shabby Princess Designs.  Happy Exchanging!!!!
1. From my mom

2. From my best friend Charelle

3. From my other best friend Tovah

4. From yours truly


 #5 From my fabulous Brother Steve
Here is another biscotti recipe from my brother to try.
# 6 is from another best friend-Tali


Cookie Exchange
Pin It!
Print Friendly and PDF

My unfinished Gifts from the Heart #3 Project

I am sorry people.  I was totally intending to post a third idea in my Gifts from the Heart series but I was not able to get it finished.  It is a "10 Things I Love about my Daughter" book.  I have a little kit I am making mine out of but you could totally make a little book yourself or a simple mini scrapbook or even just write a note.  I have to print out pictures to finish mine and we are out of colored ink in our printer so I can't get it done.  BUMMER I know.  Just wanted to share the idea anyway.  Merry Christmas.
Pin It!
Print Friendly and PDF

Dec 17, 2010

Neighborhood Gifts

It's all things candy cane in my house as I am working on Christmas treats.  Here is what we did for our neighbors and friends:
White Chocolate Candy Cane Popcorn.
Here is my version of the recipe:

White Chocolate Candy Cane Popcorn
2 bags microwave popcorn
1 1/2 bags white chocolate chips
10 regular sized candy canes
Crush candy canes in food processor or by hand but you want them crushed fairly fine.
Pop popcorn and place in a large bowl.
Melt chocolate in a double boiler or a bowl over a pot of boiling water
Mix crushed candy cane in with melted chocolate
Pour melted chocolate over popcorn
Stir to mix
Pour out onto a sheet of parchment paper and spread out to cool
DEVOUR and I mean DEVOUR

Pin It!
Print Friendly and PDF

Dec 16, 2010

Candy Cane Cheesecake

I have blogged about this cheesecake before (I call it Heavenly Cheesecake).  You can find the recipe posted here.  My husband needed a treat to take to work with him today so I decided to take this same heavenly cheesecake and give it a festive flair- Candy Cane Cheesecake.  DIVINE, DELICIOUS, SIMPLE and FESTIVE.
Follow the same recipe as the Heavenly Cheesecake but make these simple changes/additions.
1. Instead of using a graham cracker crust I used Mint Grasshopper Cookies.  You will need 2 packages.
2. Reduce the sugar to 1/4 cup and the melted butter to 1/2 cup.
3. Add 1/8 tsp of peppermint extract or oil to the filling.  I used oil which is super strong.  If using extract you may want to add a bit more.
4.  Crush one package of candy canes (I crush mine in a Ziplock bag with my meat mallet on the back steps).  Add half the candy canes to the filling.  Sprinkle the other half on top. 

This dessert is so simple and so good.  DO NOT MAKE IT JUST FOR YOURSELF-you won't be able to resist eating half the pan.  Enjoy!!!


Pin It!
Print Friendly and PDF

Dec 15, 2010

Make your own Gingerbread (paperdolls) Kit

 I know, I know-Christmas is almost here and we are running out of time, but for all you last minuters out there here is a cute gift idea for a niece, nephew or for your kids friends: A make your own gingerbread kit (gingerbread paper dolls and accessories).
It is totally simple to make.  You will need:
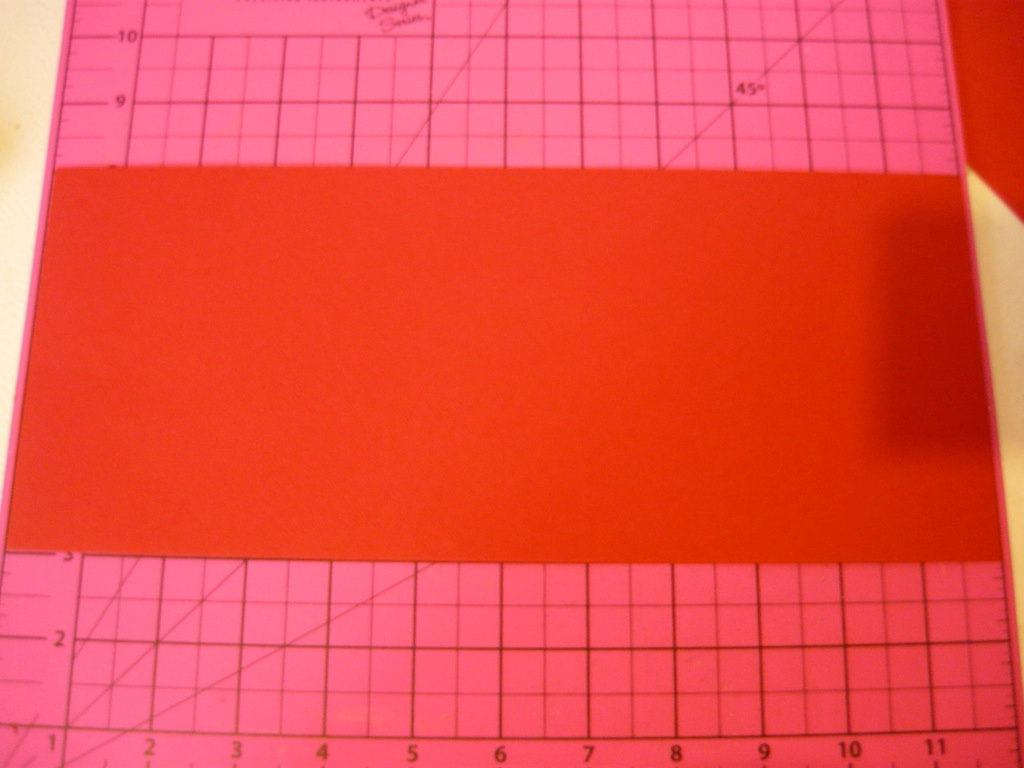
-1 piece of cardstock cut to 12x5 inches
-3 or 4 cellophane bags ( mine were 7.5x5"-it's okay if they are longer because you will be cutting them off).  These should be bags that have a way to close them.  Mine have a sticky strip.  If your's don't close you could some up with something creative, I am sure, to keep them closed.
-Paper dolls (I traced and cut mine by hand but if you can find a die cut for these, this project would be so slick).
1. Start by cutting your piece of cardstock.
2.  Fold it in half and crease, then reopen. Next score 2 lines on each side of the center fold each a half inch wide.  So you will measure out from the center a 1/2 inch, then score, then measure from that line out a 1/2 inch and score.  Repeat on the other side of the fold. 
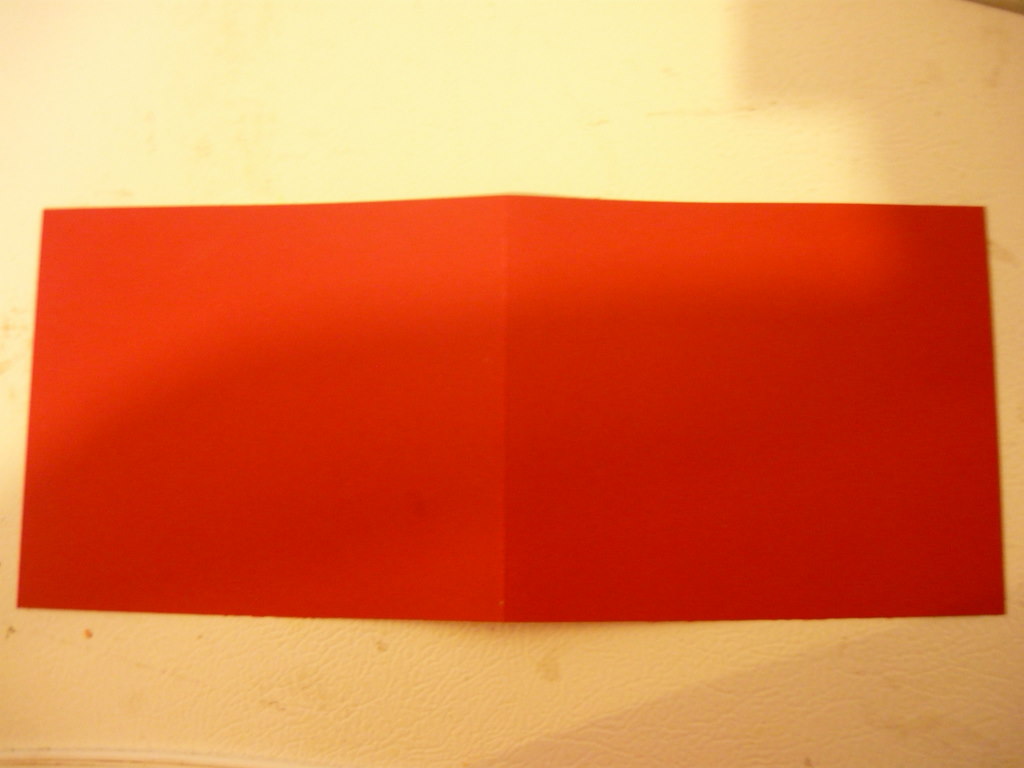
3. Fold on lines accordion style (one fold goes one direction and the other fold goes the other direction) to end up with a piece of paper that looks like this:
Top view
4. Take your cellophane bags (I used 3) and...
Cut 1.5 inches off the closed end.
5. Sandwich the bags in between the 2 folds on the inside of the card.  Here's a hint: I didn't pay attention to what side my openings were facing so if you want the openings on the top then make sure you look and adjust your bags accordingly, otherwise the openings may all be different directions (like mine).
6. Next stitch on the outside of the card a 1/4 inch from the edge. This will secure the bags in side.
It will look like this when you are done. Notice my bags are sticking out, but once I fold them over and seal them they will be tucked inside.
Here is an inside view.
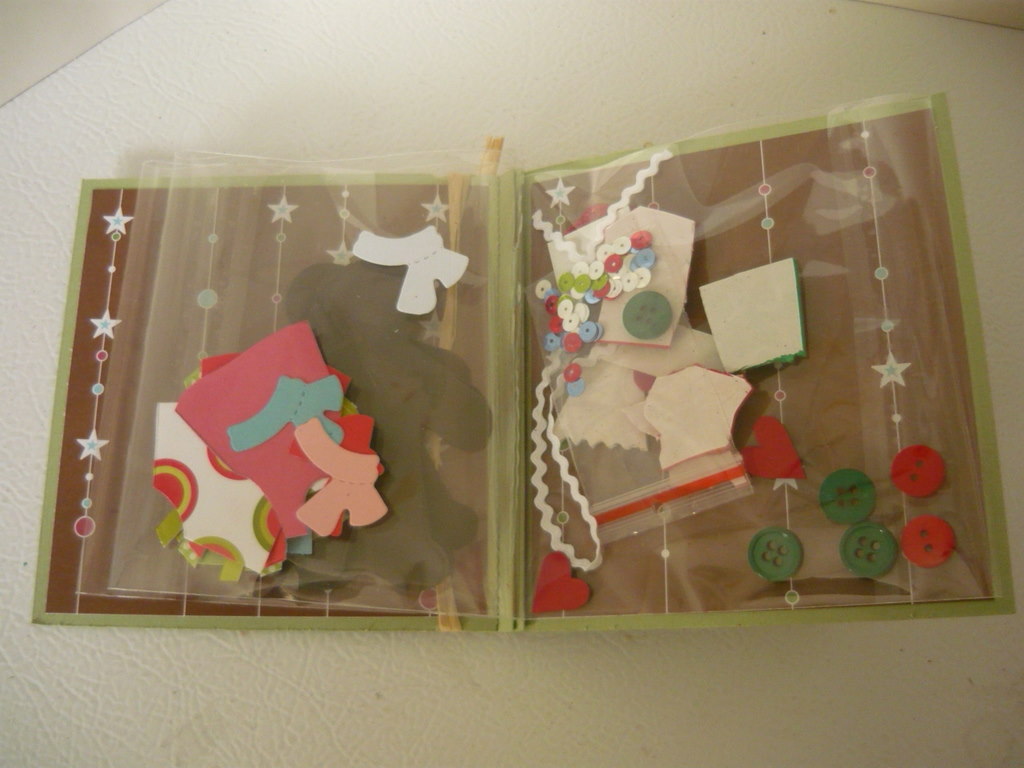
7. Now you will decorate the outside and gather all your pieces for the inside.
Here is what the inside looks like.  In one pocket I have about 10 gingerbread people.  In the next pocket I have shirts, overalls, dresses and scarves.  Other ideas would be hats and shoes.
In the last pocket I have decorating accessories like: ric rac, sequins, buttons, fun foam shapes, and hearts.  You could also include ribbon.
I would give this with a white gel pen and a package of glue dots or a small glue pen.
Now think about the possibilities people: you could make seasonal books, you could make these for kids in a hospital (not even just for Christmas but other times of the year with people bodies and accessories), you could make a birthday set, you could use the book/card format and make a little travel book with extra inside pockets to collect goodies, this could be a mini scrapbook with pictures and trinkets in the pockets.  ENDLESS possibilities.  Happy crafting.

Pin It!
Print Friendly and PDF
Related Posts Plugin for WordPress, Blogger...