
This post is in response to a readers question on how to make the flowers on the headbands I have been showing with my onesies.
To start I use a pair of women's tights (can I just say these things are super hard to find). I try and maximize every inch of one pair. I found that if I use the top, and just cut off the waist band then right below I can cut a band about an 1 1/2 wide and it is perfect for a child's head.


Next cut out circles (4 of each color). If you are using more than two colors then you only need 2 of each color. The circles don't have to be the same size and by all means they don't have to be perfect circles.

Now layer the circles one on top of the other. I do all of one color then the other. The layering order depends on how you want it to look in the end. Leave one piece out of this stack that will be the very center of your flower.

Pinch the bottom, center of the flower. This should curl up the flower edges.

Here's my pinch.

Now you will actually have to let go of your stack and take your leftover piece and pinch it much tighter then you did the others.

This will make it fold up small and tight to form the center of the flower.

Place it in the center and pinch the bottom center again.

Now you could use hot glue to hold all of these pieces together. I take mine to the sewing machine and stick my whole little flower bunch under my needle and sew back and forth a couple of times. The flower can get really thick so it depends on what kind of fabric I have used if I can sew it or not.

After you have sewn it, trim just below your stitching to remove bulk.

I usually make 3, 1 large and 2 small. You could just make one really large one. After I have sewn them I add a bit of hot glue in between the layers to hold the flower how I want it.
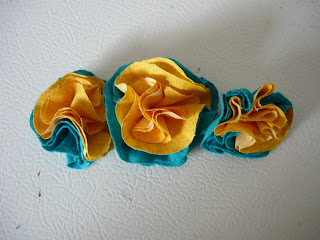
Hot glue these to your head band, making sure they are not bunched so the band will still be comfortable to wear. If the inside of the headband seems too bumpy after the glue has hardened, add a piece of felt to the underside of the headband where it will sit on a babies head.

Done!!! Happy sewing.


No comments:
Post a Comment