Jul 30, 2011


This week:

PICKED: 2 (crazy only two zucs-my one poor plant is suffering in our heat-but the 3 new plants are looking great)

GAVE AWAY: None (well actually 1 in the form of a casserole-see below)

USED: 3

RECIPES:
Zucchini Casserole (this makes me think of my mom and home and it always will)
*Increase or decrease this according to your likes-this recipe makes a 9x13 pan
2 -3 small zucchinis cut into 1/4's and then sliced into 1/2" thick pieces
2-3 carrots peeled and sliced into thin circles
1/2 cup onion chopped fine
6 tbsp butter
2 1/4 cups croutons
1 can cream of chicken soup
1/2 cup sour cream
*optional 2 chicken breasts cooked and chopped

Cut and prepare zucchini and carrots.  Steam until partially soft and cooked.
In a large saucepan melt butter.  Saute onion in butter until soft.  Add soup and sour cream.  Add 1 1/2 cups croutons.  Add steamed veggies and stir (add chicken also if including it).  Spread into a greased 9x13 pan.  Top with remaining croutons.  Bake @ 350 for 30-40 minutes.  NOTE: it is not that great as a left over-plan accordingly.

Zucchini Cookies
2 cups sugar
1 cup softened butter
2 tsp bkg soda
2 tsp cinnamon
2 cups raisins (we use chocolate chips)
2 cups peeled and shredded zuc
2 eggs beaten
4 cups flour
1 tsp cloves
1 tsp salt
Cream together butter, sugar and eggs.  Add all remaining ingredients and stir.  Drop by the spoonful onto a greased cookie sheet.  Bake at 375 for 12 mins.  NOTE: these are best hot and fresh. 

ROLLOVER: 7

TOTAL TO DATE: 19

Pin It!
Print Friendly and PDF

Jul 27, 2011

Me-M.I.A.

If you have noticed not a lot happening at Small Fry & Co. these days it is because this lady has too many irons in the fire right now and I am partially drowning in my own "to-do" list.  I have things to blog about and pictures to post but I just don't have a lot of free time.  So if you are wondering what the heck is happening here: the answer is LIFE and...
 I have a ton of these babies beginning to ripen on the vine which means salsa, pizza sauce, spaghetti sauce and bottled tomatoes are on their way.
 Small Fry and I painted her new bed frame for the new updated "big girl" bed that she is getting and little miss pumpkin will be moving into her room as well.  That is a huge job getting that all arranged.
 I have this to repurpose (a $2.00 thrift store find)
 And this to repurpose (you are going to be amazed at this one-but it is a biggy so be patient)
 And lets not forget a have plenty of these babies to take care of.
Plus my husband starts baseball practice in a week, and school in a couple of weeks, we are picking cucumbers by the pail on an every other day basis, I have a stack of things to finish for Melon Days and I just got a package of personalized clothing labels with the name "Tiny Socks Baby Co" on them (more to come on that later).  So ya, when I come up for a breath I will post, otherwise you can probably find me in the garden, kitchen or craft room.
Pin It!
Print Friendly and PDF

Jul 26, 2011

Watermelon Makeover

 I'm all about the watermelon right now.  I had this piece of wood that my Grandma Connie gave me.  She had a ton of wood left over from her tole painting days and asked if I wanted some.  I couldn't just pass them up but I also had no idea what I was going to do with any of it seeing as how my tole painting skills are nonexistent.  The other day I got an idea that I should cover it with fabric.  I wasn't sure how it would turn out but can I just tell you how easy it was and how much I LOVE the final product!!!!

Here is my wood.  I painted the edges because I wasn't planning to cover them with fabric.
 I used mod podge and covered the entire board with a layer first, then I smoothed my piece of fabric which I had cut larger than the wood over the surface.  I haven't yet figured out a way to work with mod podge without having a thin layer all over my hands-so don't be afraid to get messy.  I made sure to spread the mod podge past the edge of the wood onto my fabric because I knew when it dried it would make the fabric stiff and this would be helpful when it came to trimming down my fabric.
 While everything was drying I cut a rind shaped piece out of foam core board as well as my seed pieces.  I just eye balled these.  You could make a rough pattern first if you wanted.  I painted those the appropriate colors and let them dry as well.
 When the watermelon piece was dry I turned it right side down on my cutting matt and trimmed the fabric close to the edge of the wood all the way around the watermelon with an Exacto knife.  Then I used hot glue to attach the rind and the seed pieces.   Tada!!!

I love the final product.  I am thinking this would be a great way to cover all sorts of wooden creations.  You always see painted wooden decorations at thrift stores.  Sometimes I love the shape but hate how it is decorated.  I am ready to get my hands on something else and mod podge away. 
Pin It!
Print Friendly and PDF

Jul 22, 2011

I am happy to report that the two zucchini plants I planted are up and growing and a surprise with the one small fry planted-it is up and growing too.  This could be a zucchini nightmare.

This week:

PICKED: 4
GAVE AWAY: none (I know stingy with my zucs these days)
RECIPES: zucchini brownies (it is quite possible that I could eat an entire summer's worth of zucchini in brownie form) and stuffed zucchini (picture below)

This recipe is an adaption of something my mom used at always make (and I used to always avoid having to eat-funny how things change). 
Recipe:
As many zucchini's as you want (basically one half per person). This recipe will make enough for stuffing 4 zucchini halves (more if you use small ones)
1 lb ground beef
1 can cream of celery soup
1 1/2 cups water
1 cup instant rice
1 can corn
Grated cheddar cheese

Cut the zucchini in half and scoop out the seeds.  Then scoop out additional flesh (to chop finally and mix with the meat).  Brown the ground beef in a skillet adding the chopped zucchini pieces (the great thing about zucchini is it cooks down to nothing so it is a perfect sneaky food).  Season meat with salt and pepper and a little garlic powder.  Once beef is browned add the can of cream of celery soup, water and rice.  Bring to a boil and then cover and turn off heat.  Let sit for 5-10 minutes.  In the meantime brush the zucchini halves with oil and sprinkle with salt and pepper.  Place on bbq grill until they have a nice char.  (I am talking about like a perfectly cooked hot dog char-blackened in spots).  Remove from the grill.  Add the can of corn to the meat mixture and stir.  Stuff zucchini halves with the meat.  Sprinkle the tops with grated cheese.  Return to the grill until cheese is melted.  Yummy!!!

ROLLOVER: 6 (isn't that the same as last weeks rollover-guess I better make some more brownies)
Pin It!
Print Friendly and PDF

Jul 21, 2011

Watermelon Pennant Banner

I was getting tired of my stars and stripes/firecracker/patriotic decor.  I usually don't bust out my watermelon stuff until August but I was ready for it now so today I made the change.  I just recently sewed a new pennant banner with watermelon inspiration.  I cut my triangle pieces out of different patterns of red.  I cut a 1 1/2" strip of green fabric to sew on the tops as the rind part of the melon.  I just sewed it over the top edge of each triangle with a wide zig zag stitch.  Then after I had a bunch of those sewn I cut them into sections of 3's and 4's and pinned them onto what I would use as my backing fabric (which in this case was green canvas).  I then sewed around the outside edge of each piece (sewing it directly onto the canvas).  I cut around each triangle with my pinking shears (well not around each one exactly but around the entire row). 
 Finally I sewed a piece of green ribbon all along the top edge of the pieces (connecting them all together) to form one long banner. 
 I love how it turned out.  So bright and fresh for summer.  Perfect for out watermelon season which is just barely starting.


Pin It!
Print Friendly and PDF

Jul 20, 2011

Keeping Calm-A Real Mommy Moment

I would like to say I am one of "those moms" who doesn't lose her cool or patience when her sweet daughter finally comes to brush her teeth after being asked 7 times and because she is so preoccupied with trying to see how far down she can stick her head through the toilet seat while spitting that she drops her new Dora toothbrush in the toilet.  I wish I could say I didn't let it throw me for even one second but the truth is...I am just not there yet.  Still working on the keeping calm.
Pin It!
Print Friendly and PDF

Jul 19, 2011

Repupose a Tablecloth Series-Easy Spill Mat

This project was inspired by this spill mat I saw on She's Kinda Crafty.  I don't have any oil cloth at my house but I do have TABLECLOTHS!!!  I cut a rectangular piece 42x26 (the 26 is the width between my tables legs).  I wanted something that went under the table a bit because my little girl has a tendency to throw things under the table.
 I rounded the corners.

 Then I stitched ric rac all around the edge. 
This is perfect-less sticky, crumby mess on my floor.  I can just fold this up and shake it out outside and it wipes up super easy.

Pin It!
Print Friendly and PDF

Jul 18, 2011

Make Ahead Monday-Freezing Salsa


Fresh salsa is one of my favorite summer treats.  I just wish we could have all year long....well actually we can thanks to this make ahead.  Did you know that you don't just have to can salsa to make it last-it can be put in the freezer.  My fresh salsa recipe is not one that can be canned and I don't like canned salsa as well because it doesn't have the same flavors as fresh.  But I can make a huge batch of fresh and then portion it out into plastic containers and freeze it and take it out later.  I thaw it on the counter or in the fridge (an even microwave it if I am in a hurry).  It is slightly wateryer than normal but I usually just pour off a bit of the extra juice. 
This is a picture of some mango salsa I took out of the freezer and thawed.
See you can have the goodness of summer all year long.
Pin It!
Print Friendly and PDF

Jul 15, 2011

It was a sad week for project zucchini-one of my plants bit the dust.  I immediately did what any other sane person would so...I planted 2 more in it's place.  Come on little zuc's; don't let me down.

This week:

PICKED: 4
GAVE AWAY:2
RECIPES:
Grilled Stuffed Zucchini


ROLLOVER: 6 (don't worry I will get more zucchini motivated as the pile grows)
Pin It!
Print Friendly and PDF

Jul 14, 2011

New Favorite Summer Recipes

I have been stuck in a mac & cheese, hot dogs and pickles and tacos and beans slump for a while.  I have just not had any new recipe inspiration and cooking has become a dreaded chore (I partly blame the heat and humidity which is something unusual for the desert where we live).  But thanks to my hubby ordering the wrong cookbook for me for my birthday and Deseret Book for not having the one I really wanted I ended up exchanging for this:
I have been eyeing this cookbook for a while and I must say it is so worth every penny I spent on it.  I am like a whole new cooking woman.  What I love most: the recipes are realistic and practical for moms.  Everything looks so good and I haven't made anything I haven't liked yet.  If you don't have the cookbook the website has tons of great recipes too.  The thing is the website doesn't have all the recipes the book has and visa versa so pretty much you need to talk yourself into getting this (especially if you need recipe inspiration).
Here is a link to the website:

A couple of favorite recipes from the website are:
Brazilian Lemonade -this stuff is super delicious.  Make it when you are having company because it doesn't last.  We made a double batch and guzzled it.
Glazed Bacon Wrapped Meatloaf -I have meatloaf.  Pretty much I don't think the two words should ever be used together.  I partly blame a guest speaker we had in one of my college cooking classes that was a microwave expert and showed us how to make meatloaf in the microwave and then "disguise" the awful grey color of the meat with a red sauce.  BARF!!!!!  But I was kinda craving a meatloafish creation a while back and I searched their site and found this recipe and it is fantastic.  I used all ground beef and found it was just fine.  The glazed bacon is scrumptious and pretty much I might find myself just making it from time to time.

Recipes from the cookbook:
Oven Roasted Broccoli which basically you take your broccoli florets, drizzle them with olive oil and some salt and pepper, spread them on a foil lined baking sheet and bake at 425 for 15-20 minutes.  The ladies say it takes broccoli to a whole new level and I have to agree.  Good thing I just picked 3 gigantic heads of broccoli from my garden yesterday. 
Grilled Stuffed Zucchini (but you will have to wait until this Friday's Project Zucchini for that one).

One other recipe I am lovin right now:
Sesame Almond Romaine Salad  I needed a recipe for a pot luck and this was perfect.  I love the combination of flavors.  One of my new favorites.
Recipe (with my changes in red)
1/2 cup butter cubed (salad with butter-Paula Dean would be proud)
1 tbsp sugar
2 packages Ramen noodles crushed (flavor packet saved for another time)
1/3 cup sesame seeds
1/4 cup slivered almonds (I used raw sunflower seeds instead)
2 heads of romaine torn (I chopped mine and it worked just fine)
4 green onions thinly sliced
1 can mandarin oranges (drained)
Dressing:
3/4 cup olive oil (didn't have any so I used canola)
1/3 cup sugar
1/4 cup read wine vinegar (didn't have any so I used regular vinegar)
1 tbsp soy sauce

In large skillet melt butter and sugar over med head.  Add ramen noodles, almonds and sesame seeds.  Cook and stir for 6-8 minutes until golden brown.  Remove from heat and cool.  In a large bowl combine lettuce, onions and oranges.  Mix dressing in a separate container (I used the above recipe but only needed half the dressing so i was able to make another salad later and use the rest).  Add cooled noodle mixture to salad.  Dress and toss gently just prior to serving. 

And for a couple of random but hopefully useful cooking tips:
1. I don't cook with potato flakes (except in my bread recipe).  I don't think they make very good potatoes on their own.  However if I want to stretch my regular good old mashed potatoes a little further, just prior to mashing them I add some potato flakes (depends on how many potatoes I have to mash -could be as much as a cup of flakes) in with my milk and butter and mash them all together.  You can't even tell they are there but suddenly you have more potatoes.  This is also good if you are mashing potatoes and add a bit too much milk-just add some potato flakes (then you won't have runny potatoes).

2. Don't waste your money on store bought, premade hamburger patties (unless they are cheaper than actual ground beef-then do waste your money on them if they are 100% ground beef).  Instead buy ground beef when it is on sale and make your own patties.  I use the lid from a cottage cheese container (which happens to be practically an official measurement term in Canada-that and ice cream pail...but I digress) and use it to form my patties.

 Flip the lid over so you can have a perfect sized burger (I saw this on the Food Network)
 Then you can place the patties on a cookie sheet and freeze them until firm and bag em up for later use.
 Like making gigantic burgers like this:
 He's lovin' it.
Happy Cooking and Eating!!!!
Pin It!
Print Friendly and PDF

What's Keeping Me Busy

This is taking up the majority of my time right now.  My little pumpkin decided to potty train herself.  I was not prepared nor ready for this new adventure but she just kinda took it upon herself to do it and so far so good.  Haven't changed a diaper since last Saturday.  I have however cleaned up a few potty misses.  She is doing really well overall and is one proud little girl to be wearing Dora panties.
Pin It!
Print Friendly and PDF

Jul 13, 2011

Kid Size Duffle Bag


 Going anywhere out of the house with kids is pretty exhausting.  Getting all the right "take along" items in the right places plus shoes, coats, sippies etc.  I am usually sweating and tired by the time I get to the car (no wonder I fall asleep almost the instant my husband starts driving).  But taking kids overnight anywhere-well that is tripple exhausting.  I am not the best at packing (which bag should I put this and that in-and where to put the kids stuff).  So I came up with some cute duffle bags for the girls (one for each of them-very different colors).  They are kid sized so the girls can carry them (well pumpkin isn't quite big enough) and they hold just the right amount of stuff for each kid.  This is not a beginner project.  These are not terribly hard but they have a few tricky steps so be forewarned.  I love the outcome however and hope I can share some instructions clear enough so you can try one out too.
Materials:
1 yard of fabric (for outside)
1 1/2 yards of stiff interfacing (and I mean STIFF)
1 yard of heavy material (I used duck cloth-which I am loving right now.  It is kind of like canvas but I don't think quite as stiff).  This will be for the inside
1 zipper (longer than your bag is wide)

1. The first step is to decide how big to make your bag.  I traced a large mixing bowl on a paper to start.  This is going to be the pattern for your two round side pieces.  The size of these determines the size of everything else.  Mine were 9 1/4" in diameter.  Whatever you choose to trace you will then want to fold the circle in half, measure straight across the middle (giving you your diameter).  When you get this number multiply that by 3.14 and then add 1 inch (because you will be turning under a 1/2 inch on each side to sew on the zipper).   This will give you the length of the piece you will cut for the body of the bag.  I made my width 18 ".  Along with this cut 3 3" by 36" strips for the handles (you will need about 90" of handle for a bag this size so you will end up cutting a bit off, unless you decide to have longer handles).  Cut matching pieces out of the interfacing and duck cloth for the sides and body of the bag.
So you should have:
2 side circles of fabric
2 side circles of interfacing
2 side circles of duck cloth
1 bag body of fabric (mine was 30x18")
1 bag body of interfacing
1 bag body of duck cloth
3 handle pieces.
 2. Now you will assemble the sides and the body of the bag by placing the outer piece right side down, the interfacing on it (iron it one if necessary) and the duck cloth on it.  Pin and stitch with a basting stitch or with a serger.  I did a basting stitch first but then realized that I wanted to have finished edges inside and serged all my edges.  If you aren't going to serge them then you will for sure want to pink them with pinking shears.
Here are all my completed pieces.
 3. On my body piece I folded under a 1/2" on both of the short ends.  These are the two pieces that will attach to the zipper and form the center of the bag.
 4. This is totally the cheaters way of doing zippers.  I take my zipper, match it upso that the top of the zipper is matching with the edge of my fabric and I pin my fabric so that the fold is centering over the teeth of the zipper.  Just do this on one side.
 5. At your sewing machine pull the zipper pull down so that the zipper is open a couple of inches.  Line up your presser foot so that you are sewing about an 1/4" in from the fold of the fabric.  Start stitching and do a backstitch.  Continue sewing.
 When you get close to the zipper stop sewing, put your needle down in the fabric...
 lift your presser foot and pull the zipper pull up to close the zipper.  Put your presser foot back down and continue sewing all the way down.
 If you have a zipper that is longer than your fabric don't worry.  You can cut it off flush with the fabric edge.
 6.  Repeat this process with the other side of the zipper only this time you will have to place your bag around the free arm part of your machine and it is a bit trickier when you get to the end of the zipper.
 Tada-zipper is done.
 7. To assemble the sides you want to start by folding the side circles in half and pressing with an iron to make a crease.
 8. Match the crease with the center top of the bag (the zipper) and the bottom of the bag (may be a good idea to fold the bag and press the bottom to make a crease).  Pin all the way around the edge of the circle and bag.  Notice how the side piece sits inside the bag body piece.  USE LOTS OF PINS.

 9.To sew the two together you will flatten the side edge of the bag on the sewing machine and stitch around the edge making sure the body of the bag is not getting tucked under or folded into your seam as you are sewing.  It is pretty tricky-go slow and steady.
10.  I wanted to include this picture so that you could see the little tucks that happen as you sew.  I don't know if it is possible to sew this with out the tucks but I have found that you actually have to have a few tucks in order for everything to lay nice in the end. (and it looks like I sewed a totally crooked seam at the top but that is just how the fabric is angled in this picture).  If you didn't serge your edges then you will want to clip your edges every 1/2" towards seam and then pink all the edges.
 I serged mine after the fact because I noticed that I forgot this particular piece at the beginning.
 11.  Your half finished project should look like this at this point:

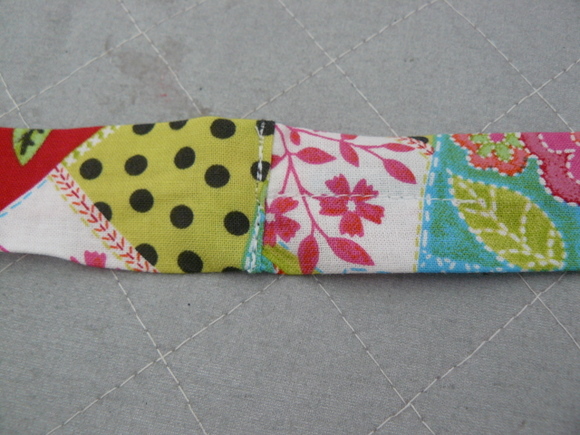
 12.  The last part is the handle.  Take your 3 fabric strips and sew them end to end to create one super long fabric strip (and trust me you will use most of it).  NOTE: if you are making a large bag than my measurements you may need to have one more strip to make this handle piece.
 13.  Now fold that long piece in half lengthwise and sew along the edge.  Measure and cut this to 90" fora  bag this size (unless you want longer handles).
 14. Turn it right side out, press it so that the crease is in the center bottom,  fold under a 1/2" on one end, tuck the unfolded end into the folded end and stitch across forming a giant loop. MAKE SURE YOU DON'T HAVE YOUR HANDLE PIECE TWISTED.

 15. Lay your loop out flat
 then fold it in half (again making sure there are no twists).  Press the folded end with your iron (I call the folded end in this picture the one that is farther from me.  This is actually the center of the loop.  There is technically a fold in the end closest to me as well but that part is going to be my two separate handles while the other end is going to match up with the bottom of my bag and be sewn down.)
 16.  Reopen this handle piece to where is making one giant loop.  The part that you just pressed with the iron should be the center.  Now take your duffle bag and lay it so that the straps are running perpendicular to the bag and the creases on the handle piece match the bottom center of the bag.  You want the straps to come in 4 " from the side of the bag.  Pin in place.   If you were to grab each handle piece and lift up the bag should be in the center now.
 17.  Continue pinning the handle pieces around the bag (making sure they are 4" in from the side).
 The last pin should be 3" from the zipper.  You don't want to sew the handle all the way to the zipper.  Make sure the entire handle piece is pinned on all the way around the bag. 
 18.  To sew on the handles first unpin the pin at the 3" from the zipper edge leaving the pin in the handle piece (just not having it attached to the bag).  Stitch along the edge all the way to the other pin on the other side.  Repeat on the other side of this handle (this gives this part of the handle a finished edge) then repin it to the bag and sew the handle on the opposite side of the bag in this manner.
 19. To sew the handle on completely begin by unzipping the bag.  Starting from the pin (at the 3" from the zipper mark) stitch across the strap (from one side to the other) and then down the side all the way around the bag to other side where you will stitch across at the 3" pin and back down and around to where you started.  Repeat on the other part of the handle. 
 Now find a super cute model to show off your finished project.


Pin It!
Print Friendly and PDF
Related Posts Plugin for WordPress, Blogger...