I was at home in Canada for a brief visit last month and heard a commercial for cheesecake pops. My mouth immediately began watering. What a fantastic idea-only I did not want to have to buy them. I wanted to find a way to make them myself. So I called up my brother who just graduated from pastry school at the French Culinary Institute in NewYork City and asked him if he would help me come up with a cheesecake pop that any home cook could make. I wanted something that didn't involve the overwhelming and time consuming business of making and baking a real cheesecake first and I wanted something that was delicious. People, my brother delivered on both fronts.
This is his little business that he has started on the side of his full time job: Dessert of Course. And just a pat on the back for him: he was a Broadway performer extraordinaire and hung up his dancing shoes to pursue his other love: sugar, and I think he has found a perfect fit for himself. Now onto the good stuff.
Just remember that this is the simple home cook version. If you wanted to get fancy you could make and bake a full cheesecake and go from there.So for this recipe you will need:
A no bake cheesecake mix
Milk (to go in the mix)
Candy canes (crushed)
Chocolate cookies (he used wafers, I used Oreos)
White candy melts (or what ever color suits your fancy)
Sucker sticks (or I used Popsicle sticks)
Begin by making the cheesecake according to the package directions. You are not going to need the graham crumbs so save them for something else. Once mixed, crush your cookies (I used about 10 oreos-and I could have maybe used a couple more. My brother used about a half a box of the wafer cookies) and fold them into the cheesecake batter then put it in the fridge to thicken.Thicken for the length of time indicated on the box. I actually never looked at the box as I was in a rush and I ended up being distracted so I came back to mine after about 6 hours and it was ready. My brother began to form his cheesecake into balls right from the fridge. He rubbed some Crisco on his hands and scooped out a bit of batter with a small cookie dough scoop then rolled it into round balls. I found, when I made mine, that the batter was a bit too soft to roll into balls so I put mine in the freezer for additional time until it was the thickness of ice cream. Then it was easier to scoop and roll into balls. Again you need to grease your hands a bit before rolling. Place the cheesecake balls onto a sheet or a plate and freeze again until they are firm but not solid as you want to insert sucker sticks into them.
Once they are firm, take the out of the freezer and insert the sucker sticks. You can dip the ends of the sticks in some candy melts (melted of course) first before inserting and that will help to hold them in place. I didn't do this with the Popsicle stick method.
Return those to the freezer and in the meantime melt your candy melts according to the package directions (only add 1 tbsp of shortening once they are melted to help thin the candy coating down).
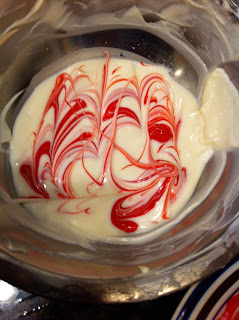
My brother got fancy and did a swirl effect in his white covering.Remove the cheesecake pops when they are frozen solid. Dip each one in the candy melts, or gently run it back and forth in the swirled candy melts if you want. Immediately dip the pop into the crushed candy canes or sprinkle them on the coating because it will harden almost instantly. Work quickly so that you can dip all the pops while they are frozen solid then store them in the freezer until you need to serve them.
Here are few different versions: swirled, dipped with candy canes, dipped and drizzled with candy melts, dipped in candy melts and then in cookie crumbs and cookie crumb coating with a drizzle.
Mine aren't quite as fancy: white candy coating with crushed candy cane bottoms.
These need to be served cold. They can be taken out a few minutes in advance to thaw partially but if you let them sit out for a long time you will have a mess on your hands. At room temperature the inside is near to a thick pudding consistency. They are better with more firmness to them like thick ice cream. And just so you can consider yourself warned: THESE ARE VERY RICH. One will be sufficient and totally delectable.


I have had the store version of these and they were ok but yours sound 10 times better and soon I will be off to the store to pick up what I need to make them. I have a potluck party to attend tonight and these will go with me. Thank you so much.
ReplyDeleteApril
Canada
A big hit at the party.
ReplyDeleteThanks again.
April
April, I am so glad they were a hit. Thanks for trying them.
ReplyDelete