I saw this idea I believe it was on the blog Pretty Partridge. I hate just throwing away good t-shirts that I have "outgrown" and even though I give a lot away to the thrift store I always think there must be something that could be made from them. When small fry was first born she was too small for all the clothes we had for her so I made her some pants from a few of my old t-shirts. The material is super soft and if you cut them right you really don't have a lot of sewing to do. So when I saw this idea I knew it would be perfect for the stack of t-shirts I have been saving. Here is a quick tutorial on how to make a twirly t-shirt skirt.
First start with a t-shirt.
Cut off a band in the desired width. Honestly I just eye balled my cutting but you could get technical and use a ruler and stuff. Leave the bottom just how it is because this will be the perfect hem for your skirt.
Serge around the cut edge. This isn't necessary I guess but gives it a nice finish. You could zigzag with your regular sewing machine if you don't have a serger.
How it looks onceserged.
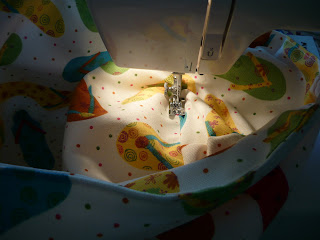
Next fold under and press the desired amount to form a casing for the elastic. I made my casing just slightly larger than the width of my elastic which was 3/4". Sew along the bottom edge of the casing leaving an opening about an inch and a 1/2 wide to thread the elastic through. I measured a pair of small fry's pants to get the length of elastic I would need. Trying to measure her waist would be like trying to measure the waist of a greased pig. Put a pin in one end of the elastic and thread it through your casing. When you have both ends at the opening overlap them and sew them together. I sew back and forth about 5 times for extra stability.
Slip the elastic inside the casing and sew the opening closed. And that is it. Start to finish in about 15 minutes.
Here is small fry in the skirt I made her yesterday. She loved twirling in it and pulling it up so she could see what was underneath.
Yesterday we went for an ultrasound to check on our new baby. When we did this while I was pregnant with small fry we did not want to find out if we were having a boy or a girl so she was a total surprise at birth and that was really fun. We decided this time however that we would find out what we are going to have. Here is small fry with the big reveal.
Yep, a little dress for another little girl on the way. We are super excited.
Indulge me for a moment if you will. Today is my birthday. I am now 30. I don't feel like I am 30, or maybe I don't know what 30 feels like. Maybe it is because we spend a lot of time with kids (my husband teaches and coaches, I was a teacher, I work with the school lunch program for the summer and I work in the primary at church) or maybe it is just that we are a house full of goofballs and don't act our age. Whatever it is, I love having a birthday and not feeling any older than I did before. Thanks to my husband and daughter for giving me a great day and to all of my friends and family who have called. Hearing from the people I love the most has made this day terrific.
I saw this idea in a Paper Crafts magazine years ago. I made a bunch of these cards then but haven't in a few years. Last night I was feeling card deprived so I just whipped one up. I love it. Of course living in a watermelon town, everything melon is cute around here. I thought I would share a quick and easy tutorial for everyone.
Start with red cardstock (could be pink too). Find a round form that you can trace to create your melon shape. I used a pot I had in my craft room. Fold paper in half so that you will have a big enough space and trace your half circle.
When it is cut out it will look like this. Sorry this is blurry.
Next trace your half circle onto green cardstock. I didn't line up my top edges on purpose because I like to have the green be slightly larger than my red part. Cut out on the line you draw. Then cut again this time inside the line about 3/4 of an inch to make a rind shape piece.
Like this. Glue this onto your red piece.
It should look like this.
Next I took a lighter shade of green cardstock and cut out a strip about an inch wide and glued it onto a piece of matt board (you could use cardboard too). This will give it some dimension. From this strip cut off random pieces (size and shape don't matter. Melons aren't perfect).
This is what you should have. I don't cut a specific amount. I just cut a bunch and then use what I need.
Before assembling I use an emery board to distress the edges of the melon rind and my little chips that I cut. I know there are specific tools for this but in these tough economic times an emery board works just as well.
Now glue the little chips you cut to the rind piece. I found that white glue works really well to hold them on but takes a bit longer to dry.
Use a hole punch and a piece of black paper to create the seeds. Glue on randomly. Add a little tag if you wish and glue another piece of paper to the inside if you wish and there you have it. Just in time for summer. Nothing says summer like watermelon.
I saw this idea on Bakerella and I instantly loved it. She has such amazing ideas but usually I don't have the ingredients handy or it looks like something that is not able to be made with a 1 year old tugging on my pants continuously. But these looked right up my alley. And they were so easy to make. Even those of you who are beginner bakers could do this. You just need a cake mix, a brownie mix, a packaged sugar cookie mix and a can of frosting. Click on the link above to find all the instructions and pdf files for the containers. I can picture these at a birthday party, or a barbeque. My husband was so impressed and we took the extras to some friends and the kids loved them.
When I was little my dad would teach us the names of various body parts in Ukrainian which is the language he grew up speaking. Our favorite by far was the word for belly button which is poopitz (I have no idea how to really spell that word). At least that is what we grew up knowing it as. So naturally as I am teaching small fry her body parts I would have to teach her poopitz. She knows head, mouth, nose, ear, tummy and feet and now she knows poopitz too. I am sure most of you are not interested in this but I happen to know a few family members and friends who will be excited to know there is another child in the world that knows her poopitz. Also thanks to my husband for bearing his poopitz to the world wide web. I don't think he knew I was planning on posting this. Love you honey.
Have you ever heard of this book? I saw Jessica Seinfeld on Oprah talking about her book and I was really interested in checking it out but that was a year ago and I never got it done. I was lucky though because my husband remembered me saying I wanted it and he bought it for me for Mothers Day. Basically what she does is makes vegetable purees from steamed vegetables and fruit purees that she then adds into regular meals that she makes and she comes out with food that is good tasting and good for you. A sneaky way to get extra fruits and vegetables into your kids. She isn't against giving them regular veggies; she does that too. Small fry is a pretty good eater but sometimes I find it hard to get her enough vegetables cause they are hard for little kids to eat (so many are too crunchy if they aren't cooked) and she needs variety. Anyway I have tried only a couple of recipes so far but so far so good. I first made banana bread that had cauliflower puree in it. I don't like banana flavored anything but my husband said it was really good and small fry gobbled it up. Today I tried making chicken nuggets with broccoli puree and flax seed meal. They were soooooo good. I must admit they were kind of tricky to make (keeping the coating on while frying them) and I would make them in much smaller pieces next time so they will cook faster but I would do it all again because they were so good. The taste was familiar to me for some reason. Small fry loved them and ate up every bite I gave her. Here is what our lunch looked like. I made potato chips in the microwave (I have a post about that somewhere on this blog), chicken nuggets and grape tomatoes. I am looking forward to trying more recipes. I highly recommend the book. I am not going to post the recipe for the chicken nuggets but if anyone wants to give them a try before buying the book leave a comment and I will get you that recipe so you can see for yourself. (Note: they look a little extra brown because my pieces were too big and took a long time to cook. Little is better for chicken frying success I have finally come to accept)
One other easy and deceptive food idea. This one is courtesy of my husband. I wanted to make waffles this morning (from a mix because it is easy) and there were just 2 of us having them. I used 1 cup of mix and to that I added 1 individual portion sized packet of instant oatmeal (mine was brown sugar maple flavor). Then add the oil and water, mix and bake em. The flavor is great, and you can add some extra fiber to your breakfast. Deceptive and delicious.
Back when I did my first giveaway of 2 fabric baskets I had a few people ask me for a tutorial on how to make these. The idea is not originally mine. I got it from the blog Pink Penguin. But I did alter it a bit and since I was going to make a couple of these as a gift I thought I might as well turn it into a tutorial.
For the large basket (the one I made in this tutorial) you will need to start with 2 pieces of fabric 20X22 inches. I would not recommend making one larger than this unless you can find a way to make it more stable. But I am not saying that is not possible. I used a light weight canvas for this basket. This worked perfect for the outside and the lining. If I was using regular cotton fabric I would use canvas probably for the lining for stability. You will also need a piece of batting this same size. For the handles you will need 2 pieces of fabric 12X3".
Recap:
2 20X22 pieces fabric
1 20X22 piece of batting
2 pieces of fabric 12X3 for handles.Step 1 fold your piece of fabric in half lengthwise right sides together (so that it will now measure 22X10.) Press with an iron on the fold to form a sharp crease. Open it up and fold each end in to the center crease and press again so that you will have 3 creases now. These will act as guides for sewing in the next step.
Step 2: Unfold your fabric and place the batting on the wrong side of the fabric and pin the sides. I hate the kind of batting that I am using for this project but I was all out and this was the affordable stuff at the store at the time. Never again!!!! It just stretches way too much. But anyway pin it just the same. Now using the creases on the right side of the fabric as a guide, stitch along the 2 outside creases (not the one in the center, though that wouldn't hurt).
Step 3: Now fold the piece of fabric w/ batting attached right sides together and pin the 2 side edges. Sew these at 5/8". Trim off the excess with pinking shears. Step 4: Next you will box the corners. To do this pull out the bottom corner of the bag and fold the side down inside the bag (I use the center crease as a guide where to match up my side seam). Measure up 3 inches from the point and mark with a pin or pencil. I marked mine with a pencil and then used a ruler to draw a straight line. Pin along this line to hold all pieces together and sew. Repeat with the other side. You will have something that looks like this. Now trim off the excess and turn the bag right side out. Step 5: Now repeat all of these steps with the other piece of fabric (minus the batting step). Step 6: Place the basket piece with the batting inside the other basket piece (right sides together) and pin the top edge matching up your seams. Sew around this top edge with a 1/4' seam leaving an opening about the size of your hand. Make sure you backstitch on each side of the opening. Step 7: Turn the basket right side out, pushing the lining down inside. Iron the top edge flat and tuck under the edges of the opening and pin closed. Sew around the top edge as close to the edge as you can. Step 8: To help hold the lining inside the basket I sewed along my boxed bottom edges through both layers. Step 9: Now make the handles. Take one piece of handle fabric and fold it in half wrong sides together. Press with the iron. Now open this piece up and fold each edge to the center. Now fold it in half to make a skinny strip. Top stitch each side of this strip at 1/8". Step 10: Fold under about 5/8 inch on the top of each handle and pin the handle to the side of the basket. I measured 2 inches from each side of the center side seam and pinned. Now sew around the top of the handle in a square to attach it to the basket. Repeat with the other side of the handle and the other side of the basket. And it is finished. You can make any size of these using the same steps.